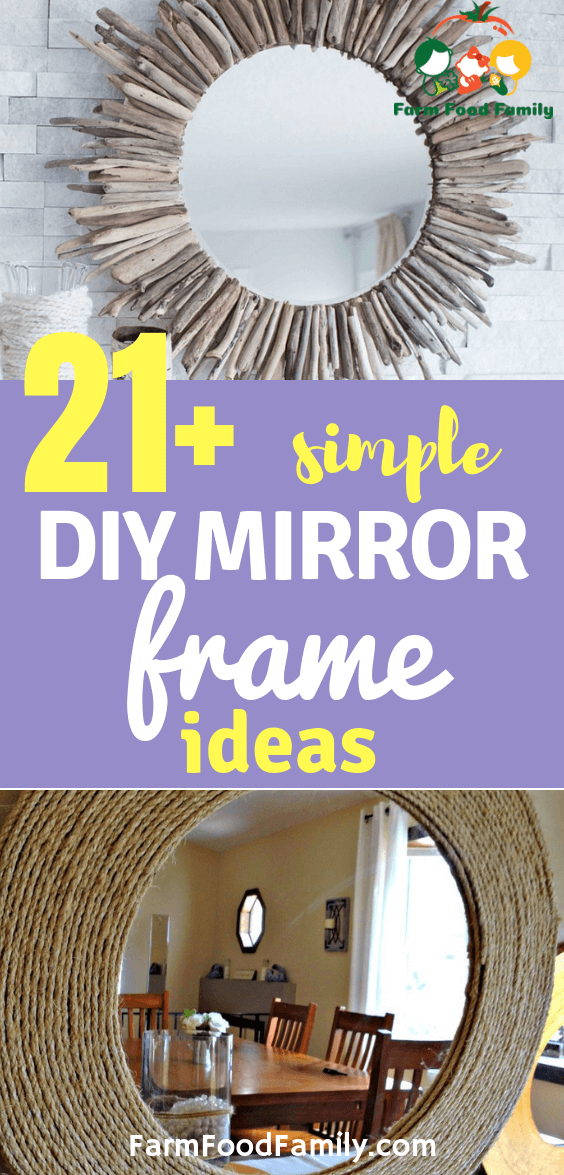
21+ Simple DIY Mirror Frame Ideas and Designs (2026)
Do you wish to add mirror frames to your room? It is the right thing to do, only that you need many ideas to help you do things differently. There are many mirror frame ideas for you to try.
The mirror frame ideas do have easy-to-follow tutorials that will guide you as you do the project. Check out 36 mirror frame ideas here and choose the options that will fit well with your desires.
A. Learn to Custom-Frame Mirrors Yourself with Picture Frame Molding
To customize a mirror to the décor in your bathroom, hallway or other living space, edge the mirror with frame molding. Purchase frame molding from your local frame shop. Buy it finished or unfinished and paint or stain it to match your home’s color scheme. Using wide frame molding for mirror edging can make the mirror look larger to fill the wall. Conversely, using thin molding can give the mirror an updated look without taking up much more space.
1. Supply List
- Tape measure
- Frame molding
- Miter saw
- Clamps
- Staple gun
- Staples
- Paint or stain
- Edging decorations
- Plastic clips
- Screwdriver
- Eyelet
- Picture wire
2. Step 1
Measure the mirror’s thickness. Buy frame molding with a depth, or rabbet, of this same measurement. Select the frame molding according to your tastes and the style of the room where the mirror will hang. Local frame shops will usually cut the frame molding to size for you.
3. Step 2
Measure one side of the mirror. Mark this on the frame molding. Cut two pieces of molding to this length using a miter saw to cut the ends at 45-degree angles.
4. Step 3
Measure one side of the mirror adjacent to the first side you measured. Cut two more pieces of frame molding to this length. Again, use a miter saw to cut the ends at 45-degree angles.
5. Step 4
Place the molding pieces face down on a flat work surface. Match the corner angles and clamp them together. Fit the mirror into the frame to make sure it will fit correctly. If you have to, trim the frame molding if it doesn’t fit.


6. Step 5
Use a staple gun to staple the corners of the frame together on the back. Use at least two staples per corner. Make sure the staples do not protrude through the front of the frame. Remove the clamps.
7. Step 6
Paint or stain the mirror edging if needed or desired. Paint or stain the inside edge of the frame molding to match the outside because the mirror reflects this edge once it’s mounted. Glue on other decorations such as wooden cutouts, decorative tiles or painted scenes. Have your kids decorate the edging before you insert the mirror to make them part of the project. Let the paint, stain or glue dry completely.
8. Step 7
Lay the edging face down and slide the mirror into the rabbet. Screw a plastic clip on the back of the molding on each side of one corner to hold the mirror in place. If the mirror is very large, use more clips.
9. Step 8
To hang the mirror, screw an eyelet ¼ of the way down on each side of the edging on the back. String picture wire between the eyelets, looping it through each eyelet twice and twisting each end around itself. Hang the mirror by this wire. Use plastic-covered picture wire; it’s easier to work with and will not puncture your skin the way uncoated wire can do.
B. 21 DIY Mirror Frame Ideas
1. Tray turned mirror
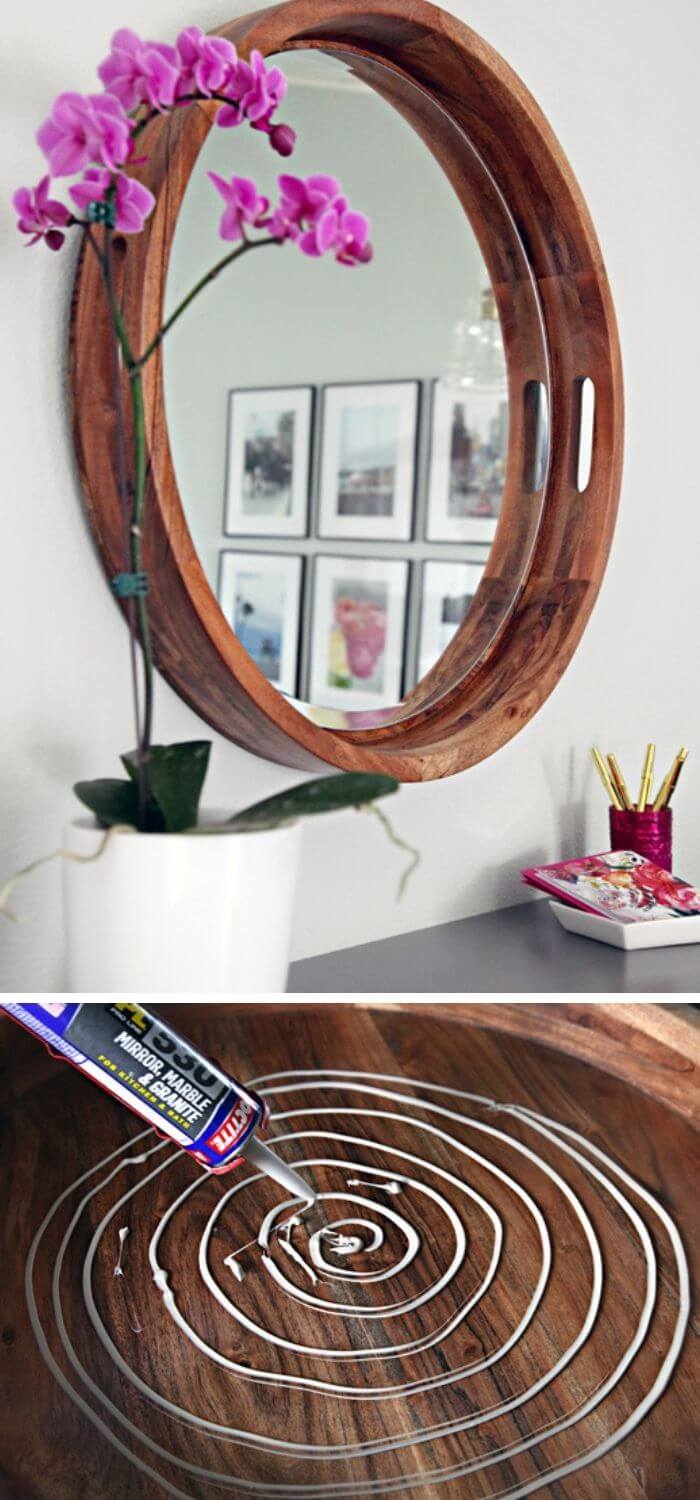
The first idea in the list is the tray frame idea. You may be possessing several old trays, and you don’t know what to do with them. It will be perfect if you turn it into a tray frame mirror. Check out the steps from the tutorial and get something to do with the tray.
Source: https://www.iheartorganizing.com/2015/05/diy-tray-turned-mirror.html
2. DIY wood framed mirror
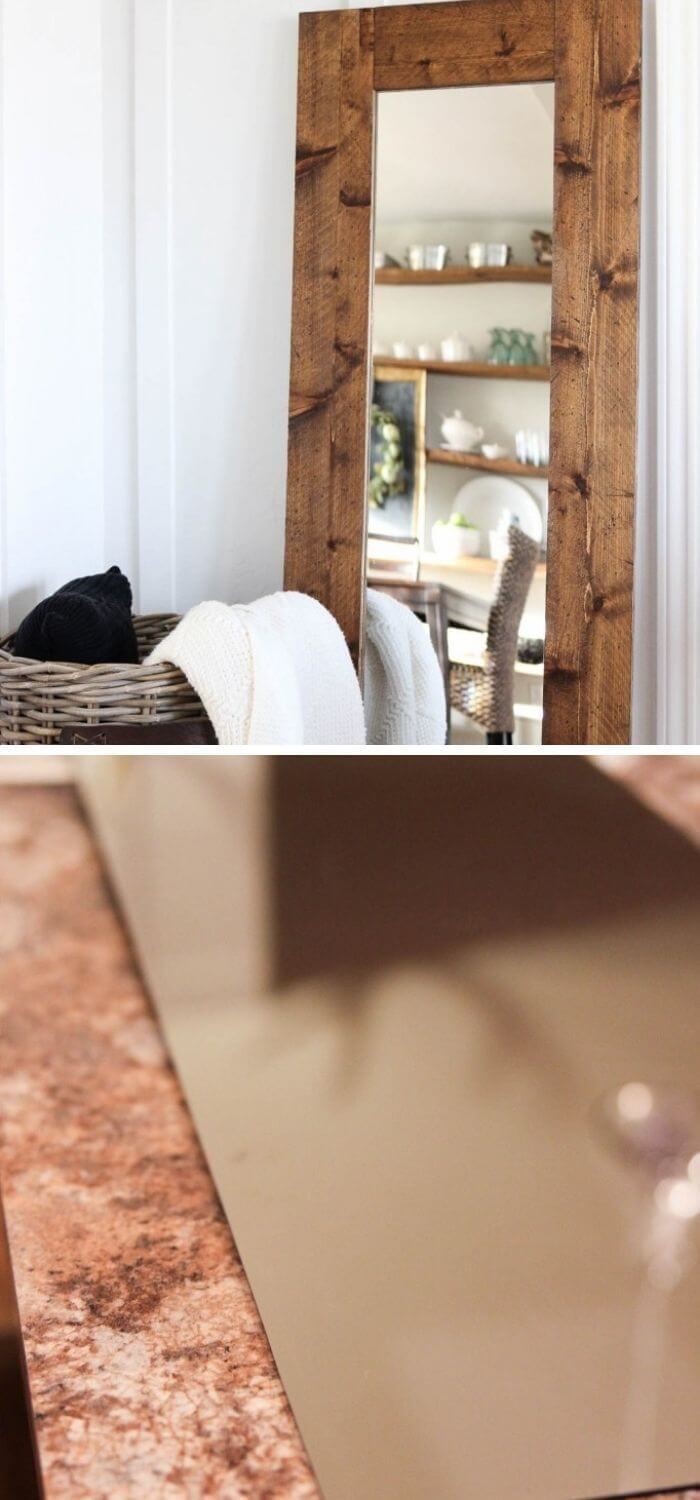
The DIY wood framed mirror is beautiful, and it will be a nice mirror frame along the corridors. Check out the instructions from the source that will inspire you to get started with a wood-frame mirror.
Source: https://www.thewoodgraincottage.com/2015/02/06/diy-wood-framed-mirror/
3. DIY round mirror frame
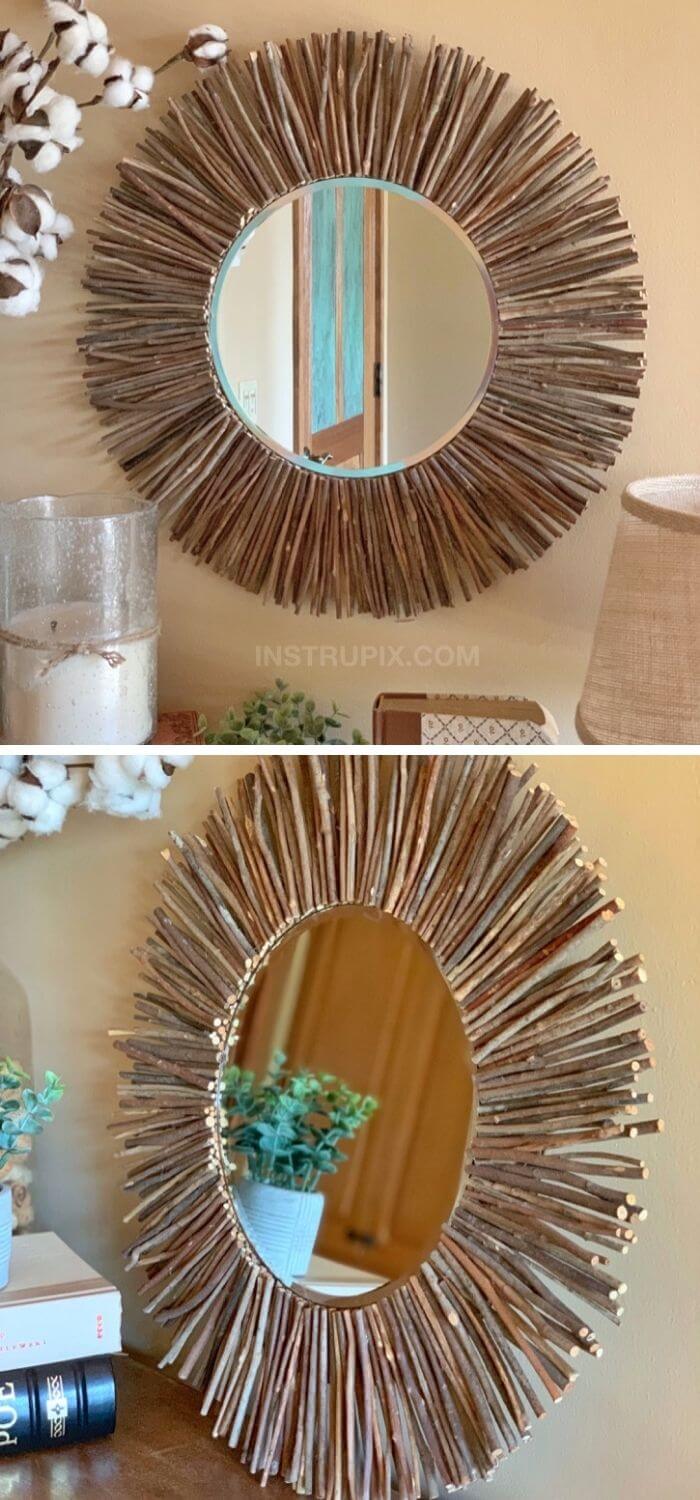
The DIY round mirror frame is among the best designs for mirror lovers. You need something that will be unique, unlike the ideas we know. Check the DIY round mirror frame that appears like a jewel.
Source: https://www.instrupix.com/diy-stick-framed-round-mirror/
4. Full-length mirror frame
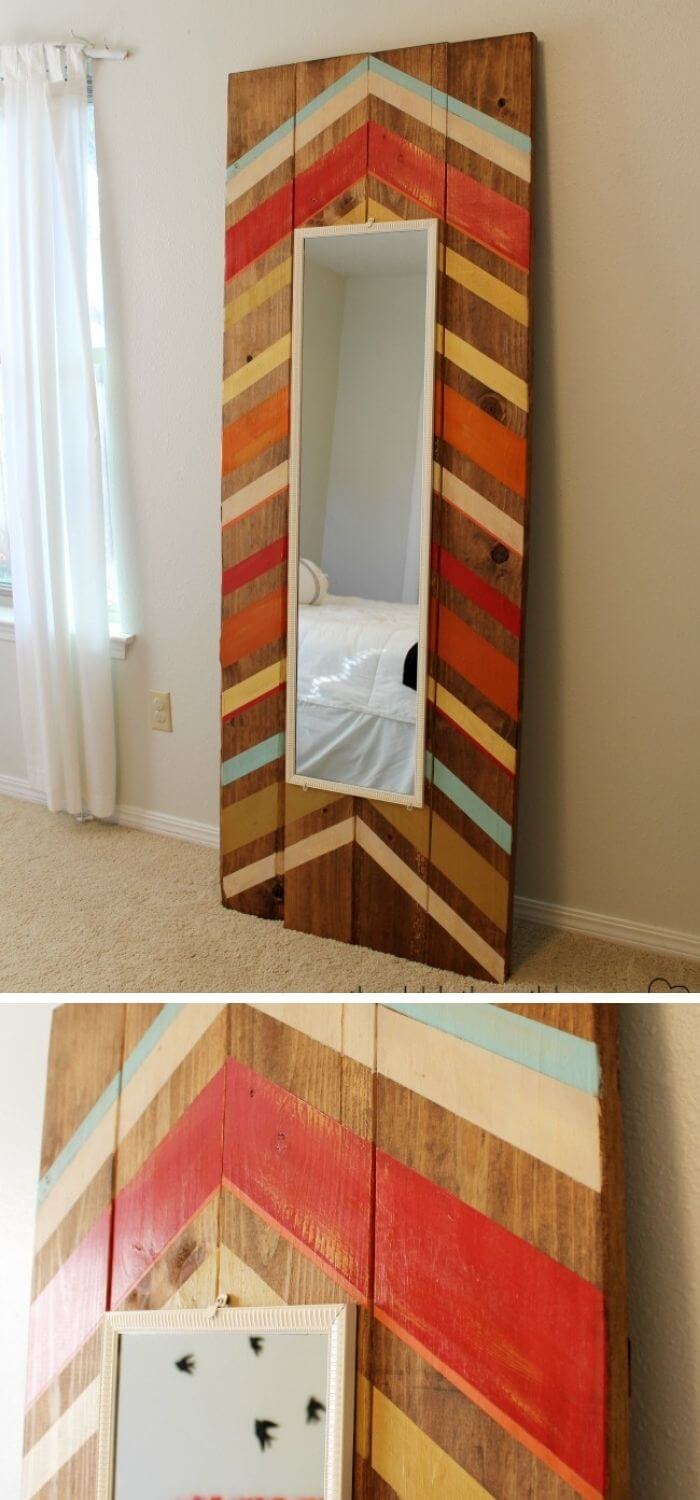
Possessing a full-length mirror frame will make it easy for you to see your full body when you are dressed for an event. Check out if this cute full-length mirror frame will do it for you. It’s a nice frame, and it won’t disappoint your wardrobe.
Source: https://www.thechildatheartblog.com/diy-full-length-floor-mirror/#_a5y_p=2484543
5. Anthropologie frame mirrors
Anthropologie frame mirrors are among the best designs that you can choose. If you need something that will present a unique theme, then this framed mirror will do it for you. Check out the tutorial for everything you need to know about the idea.
Source: https://www.musingsonmomentum.com/diy-anthropologie-mirrors/
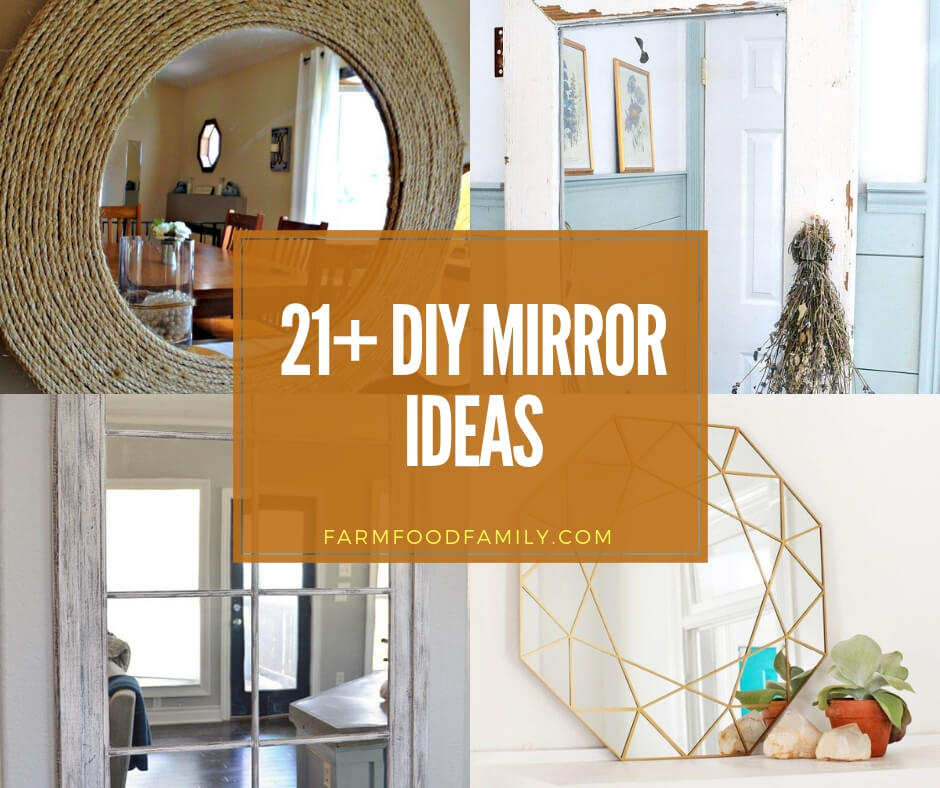
6. DIY rope mirror
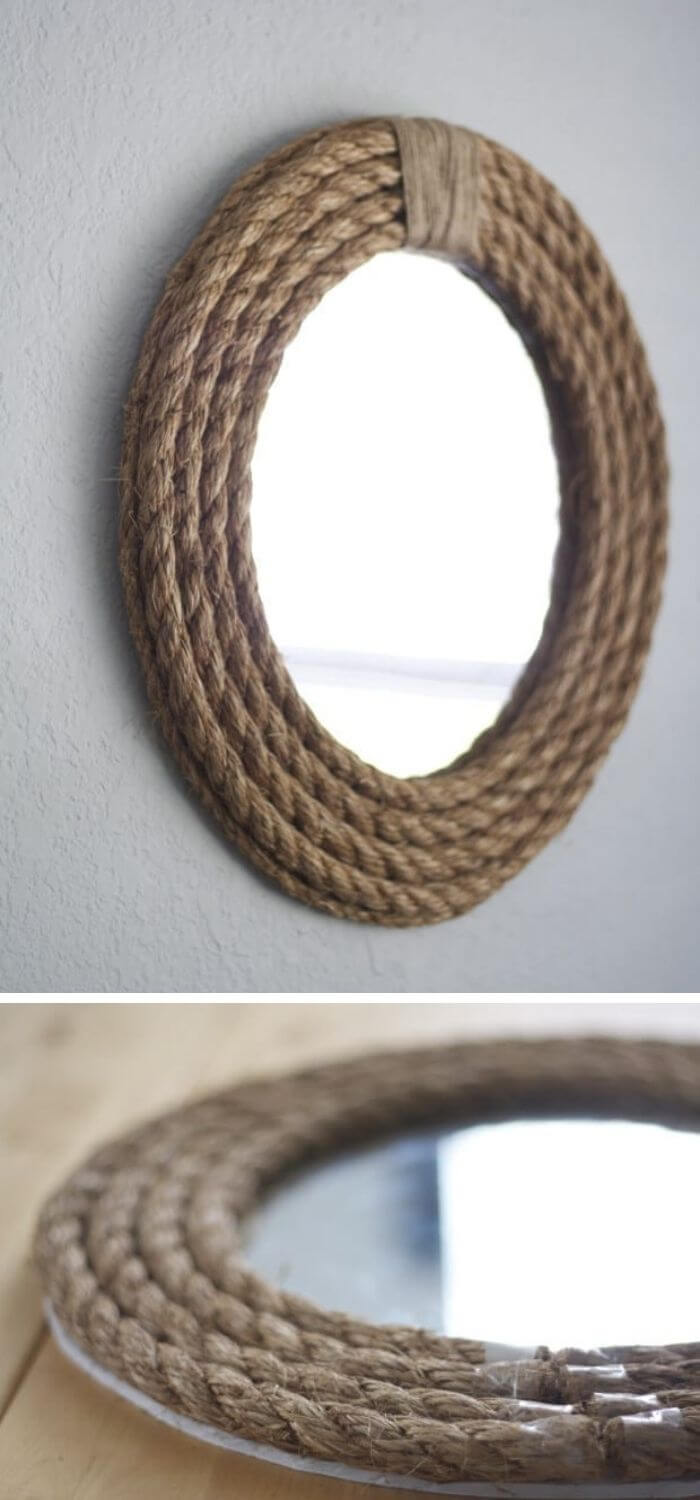
DIY rope mirror ranks best among the mirror frames you can ever get in wherever you go. The tutorial elaborates on all the details you need to know when making it. It is a perfect mirror frame that will fit anywhere from the living room to the wardrobe.
Source: https://moderndaymoms.com/diy-rope-mirror/


7. DIY window pane mirror
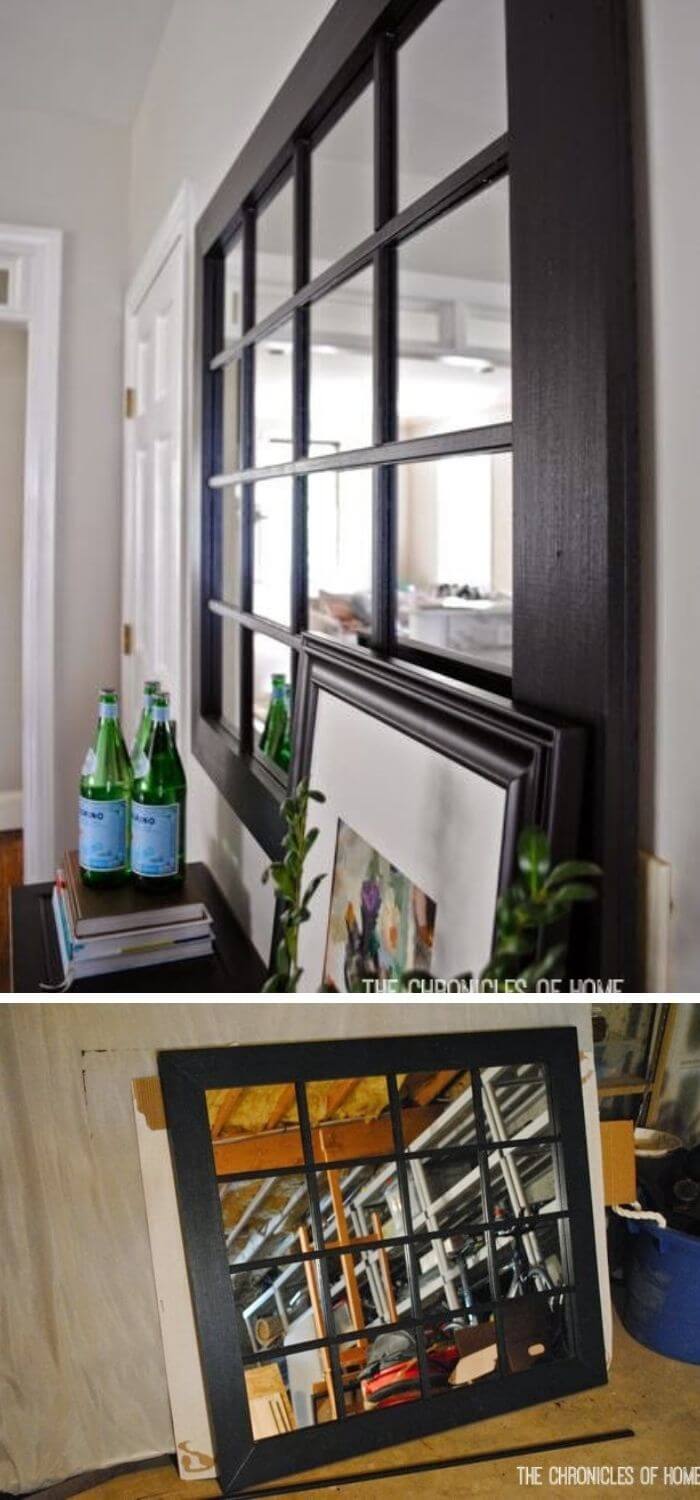
The DIY window pane mirror is another cute project that you want to try at home. Consider the steps from the tutorial here and see if you can get started with a new project. Do it yourself following the steps from the tutorial.
Source: https://www.thechroniclesofhome.com/2014/05/tutorial-diy-windowpane-mirror.html#_a5y_p=1644546
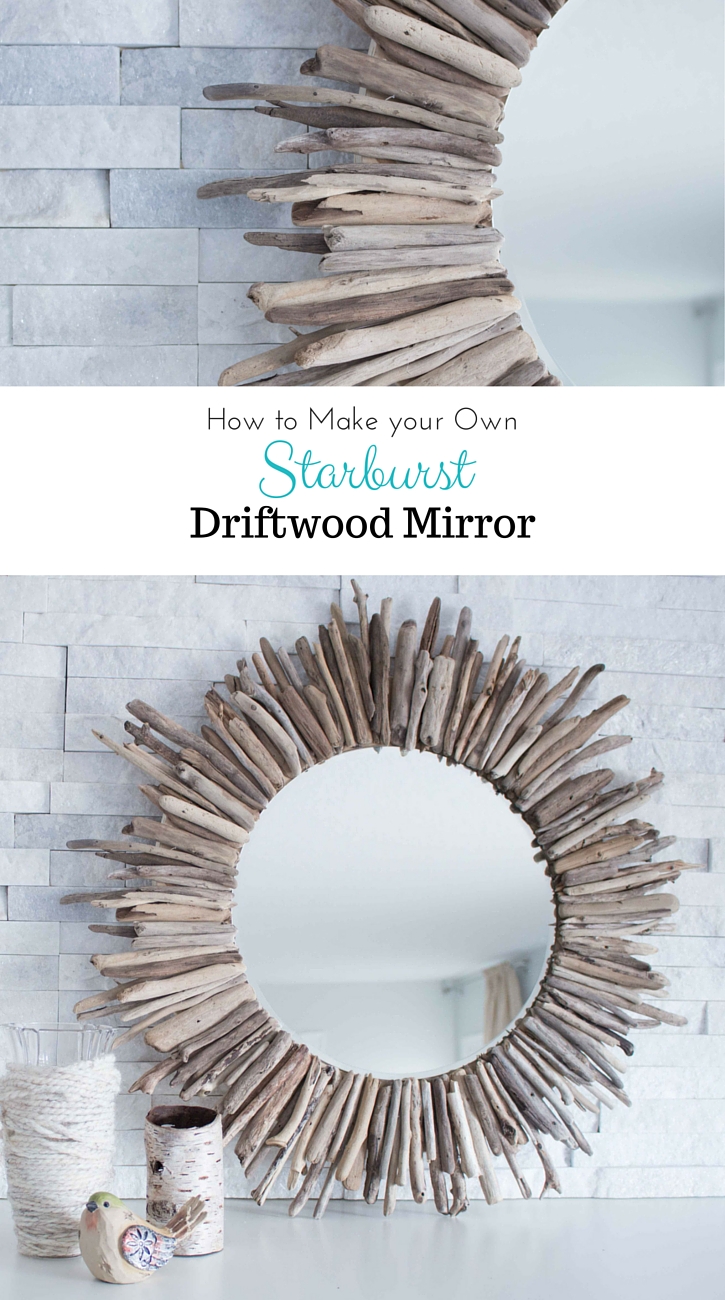
8. Easy DIY starburst driftwood mirror
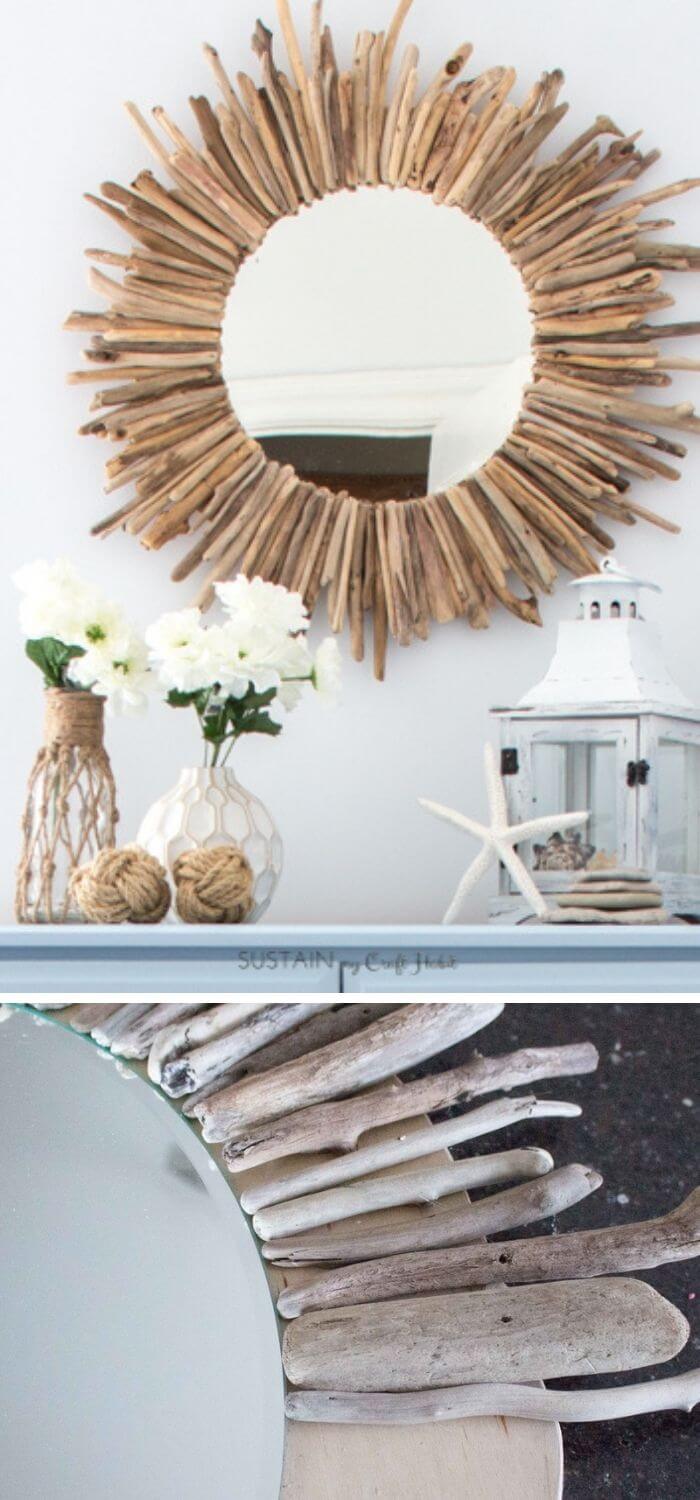
Have you considered the driftwood mirror frame? It is a cute design that you can have for your wardrobe. Try the easy DIY steps of the starburst driftwood mirror from the source.
9. DIY rustic mirror shelf
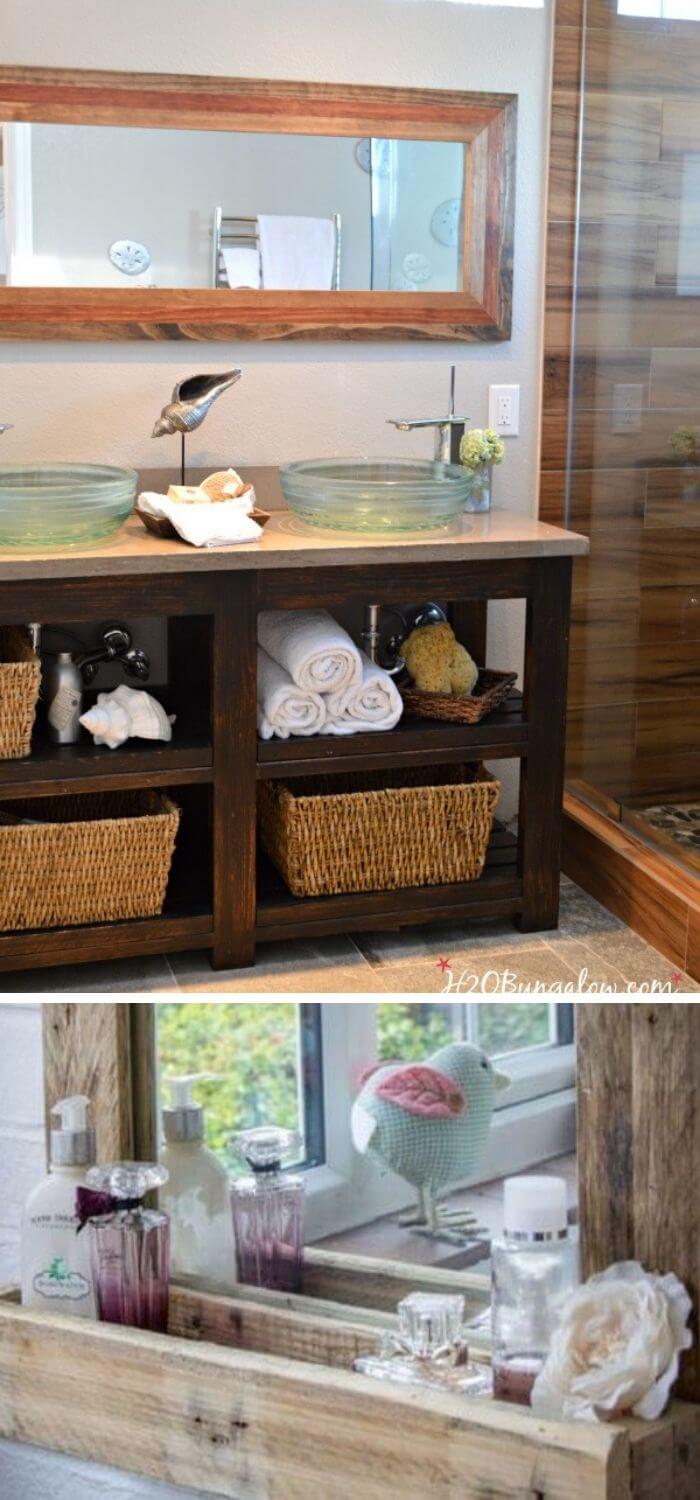
One of the best home decor ideas that you can do yourself is to make a rustic mirror shelf. It is a perfect frame like a shelf that will impress you every morning as you wake up. You can place it in your bathroom or wardrobe whichever will please you.
Source: https://h2obungalow.com/modern-diy-rustic-mirror-frame/
10. DIY mirrored vase
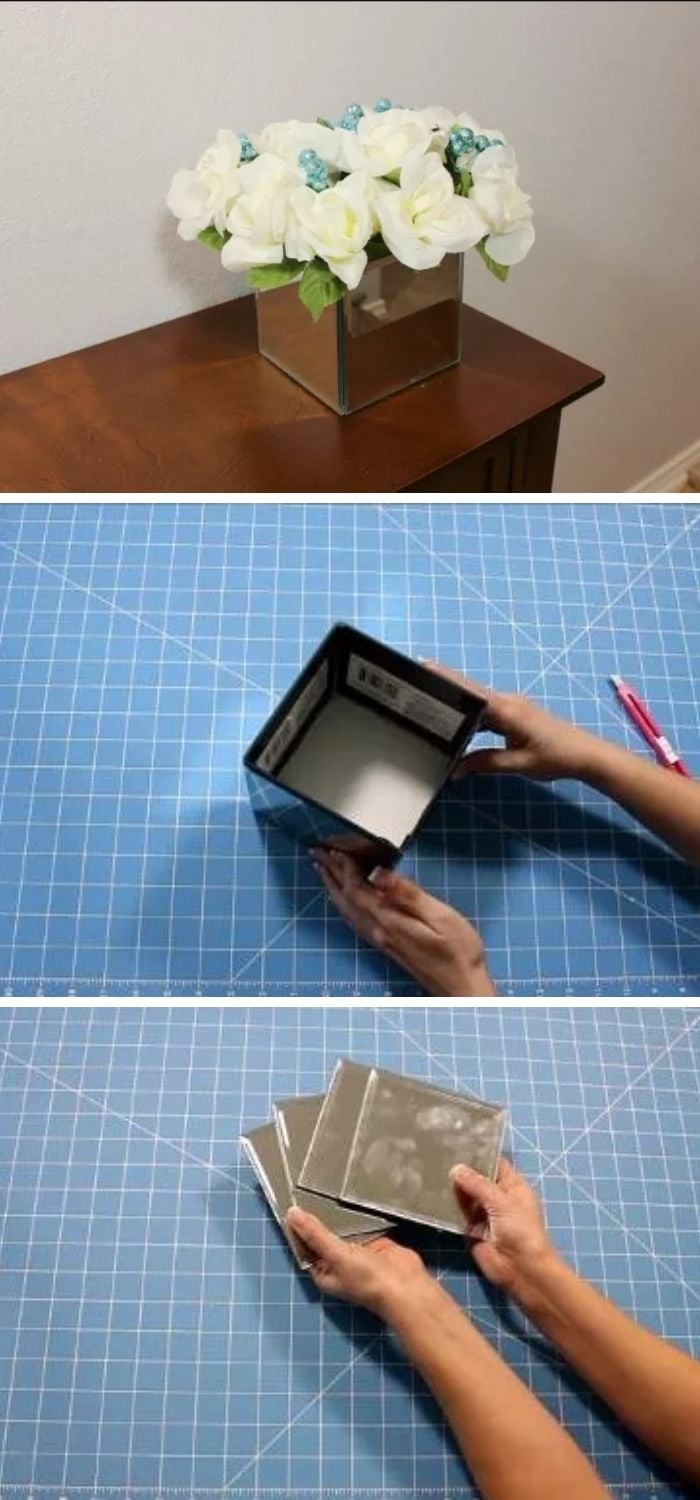
The idea from Miss Kiss is beautiful and will serve as a perfect DIY mirror frame idea in your living room. Check out the tutorial for inspiration on how you are going to go about it.
Source: https://www.youtube.com/watch?v=TBasPOyCE10
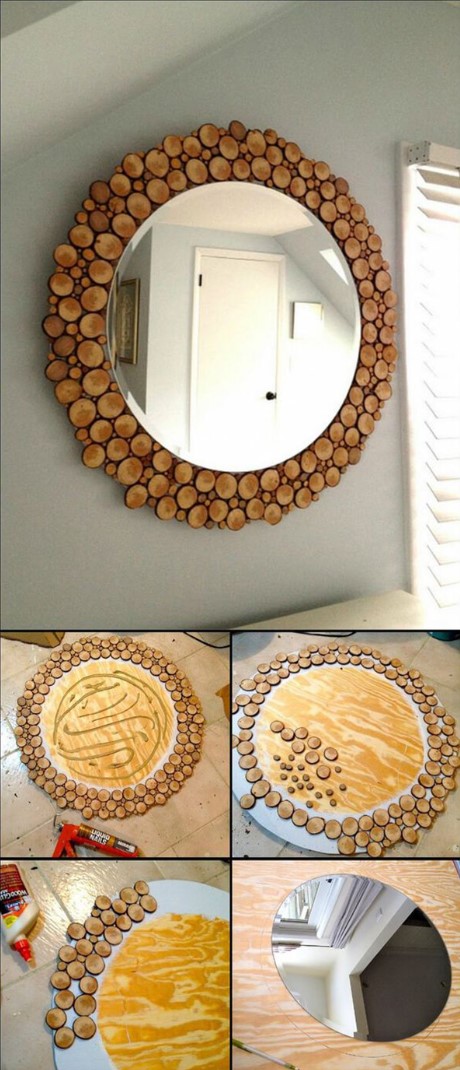
11. DIY wood slice mirror

A wood slice mirror frame is the best idea that you can ever try. Everything here looks impressive, and you will love all-size wood slices that you will combine to make a circle frame. You can borrow the idea to make even an oval frame or whichever shape will impress you.
Source: https://theownerbuildernetwork.co/easy-diy-projects/diy-wood-slice-mirror/
12. DIY yardstick mirror
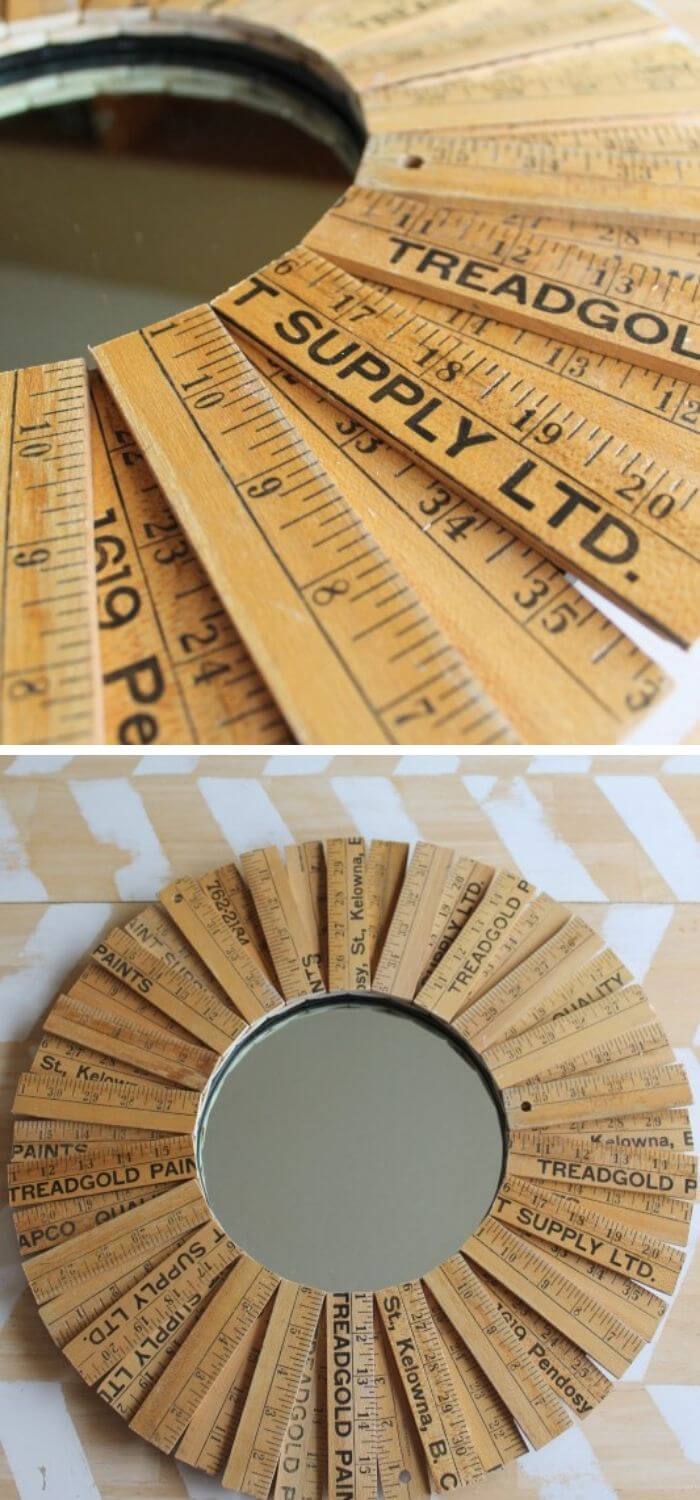
DIY yardstick mirror is among the best designs that you can do. If you need a unique frame for your bathroom or the room, the idea is best. The yardstick mirror frame is easy to make, and you can refer for inspiration from the source.
Source: https://homemadeheather.com/diy-yardstick-mirror/
13. DIY pretty robe mirror
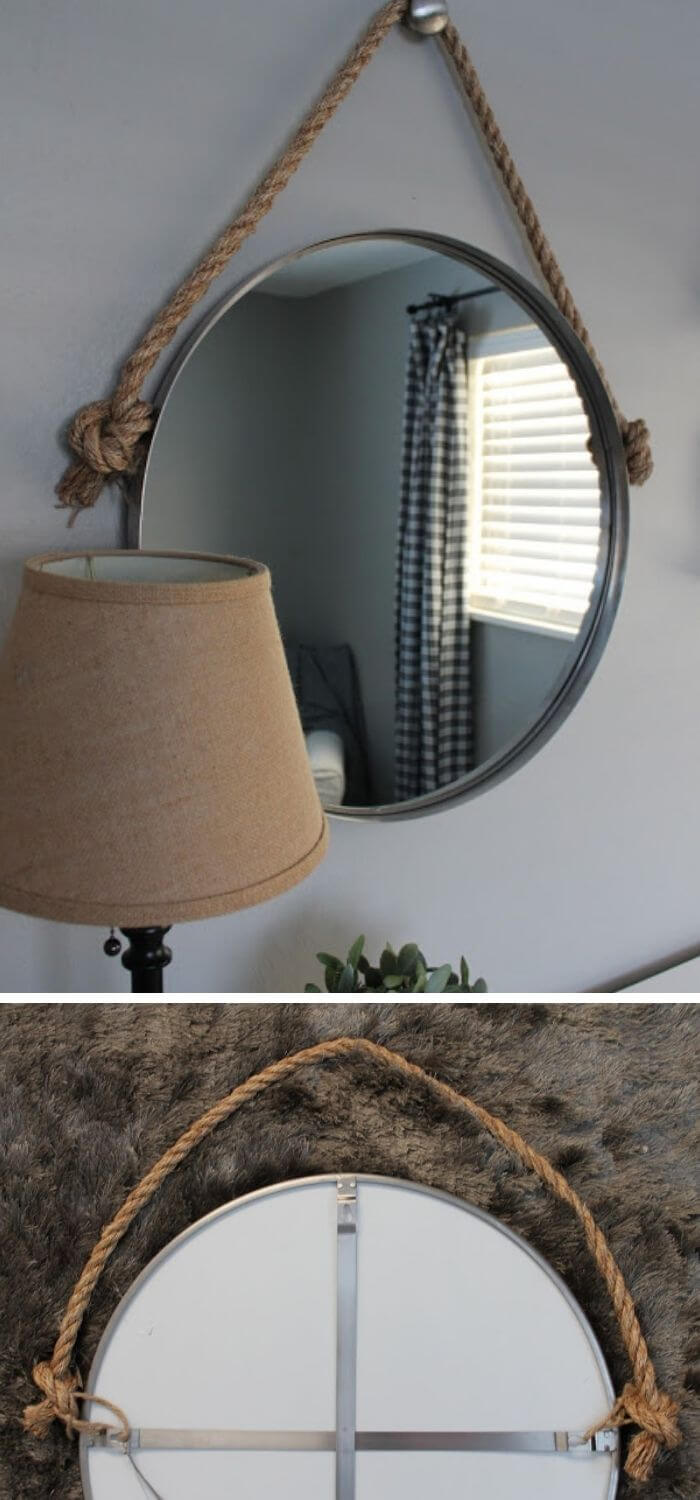
The DIY pretty robe mirror is cute when it hangs on the wall. You don’t need to look for many things that will decorate your porch. You need to check the DIY frame idea, and there you have something to do.
Source: https://www.wonderfullymadebyleslie.com/2015/11/diy-rope-mirror.html
14. DIY triangle mirror
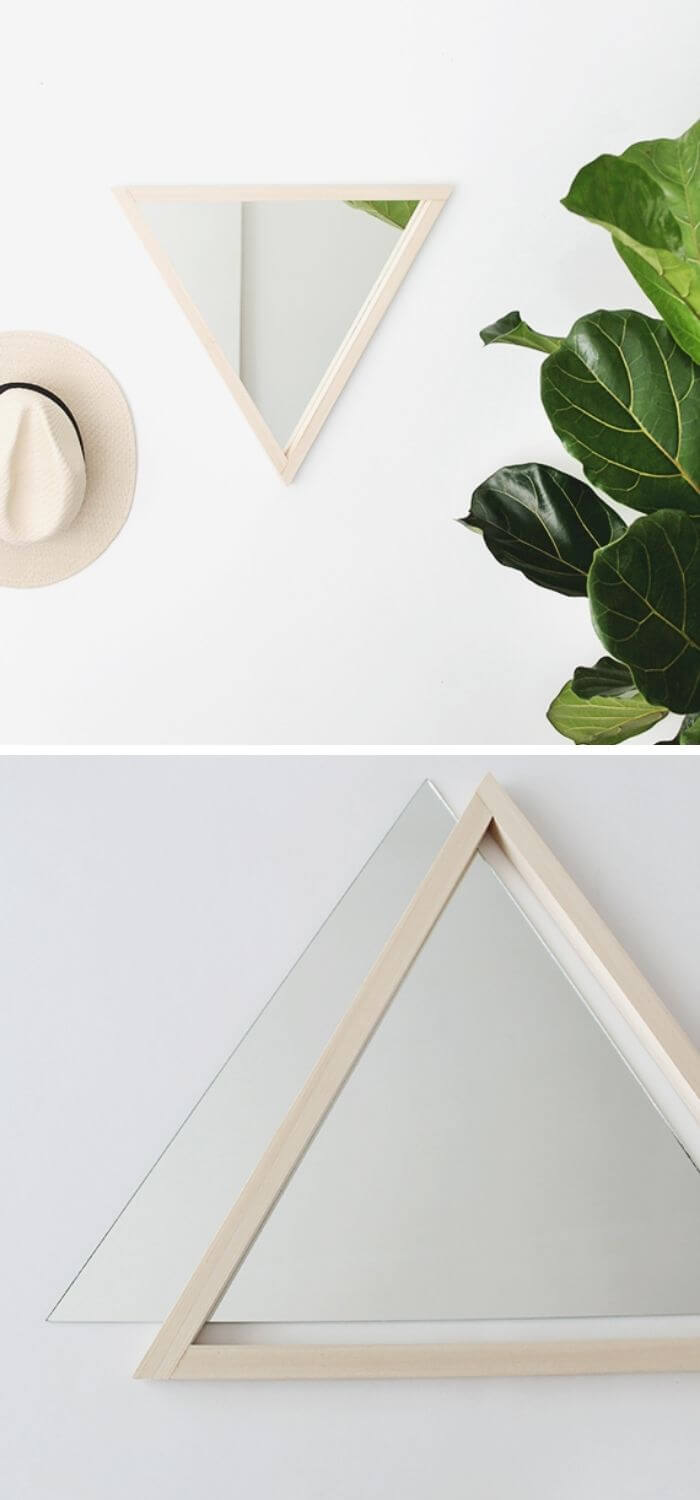
Here is another mirror frame that takes no effort to get done. It is one of the cute ideas that you want to give a try considering the simple steps that the creator presents on it. Check out the steps and make something new in your wardrobe.
Source: https://almostmakesperfect.com/2015/04/21/diy-triangle-mirror/
15. DIY modern mirror frame
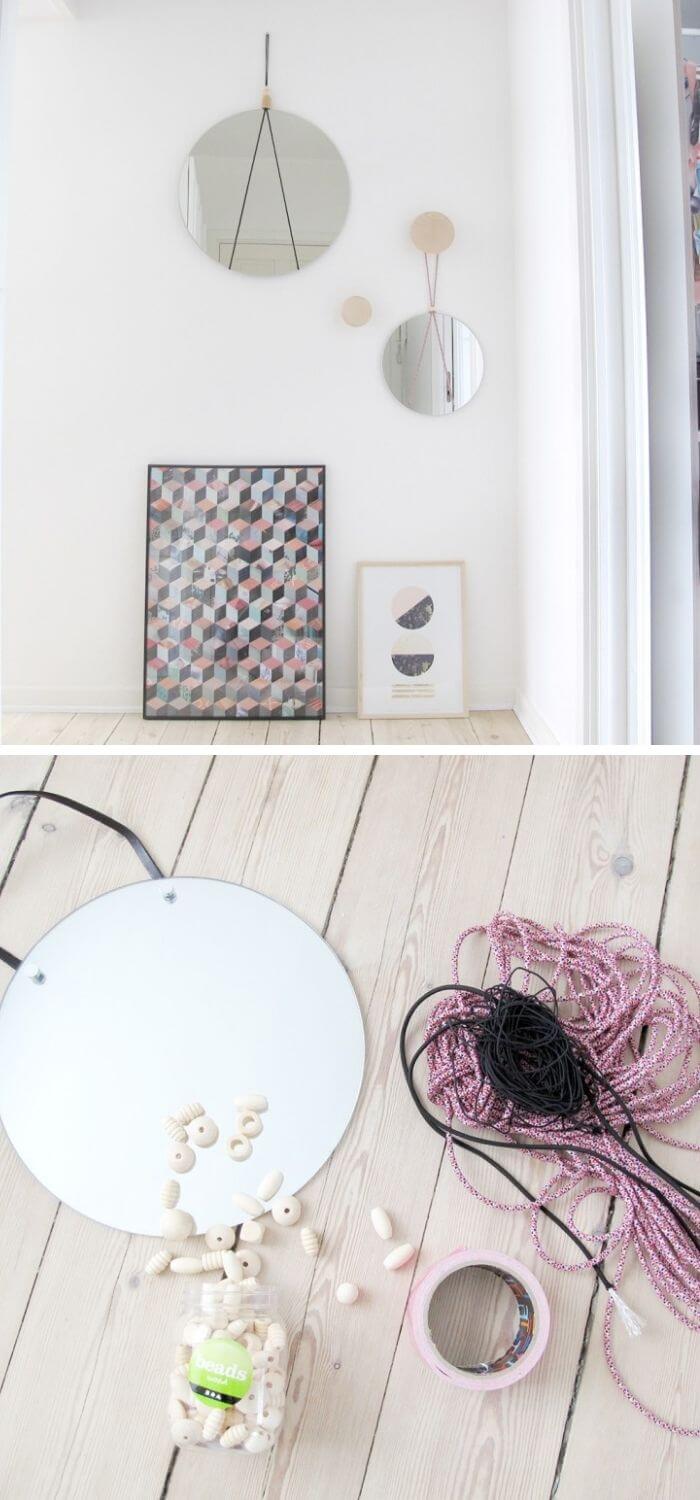
Check out the steps on how you are going to get started with a DIY modern frame and do it yourself at home. It is a beautiful idea that will bring a rare decoration to your house.
Source: https://frkhansen.dk/2015/03/diy-spejl.html
16. Framed Mirror for Girl’s Bathroom

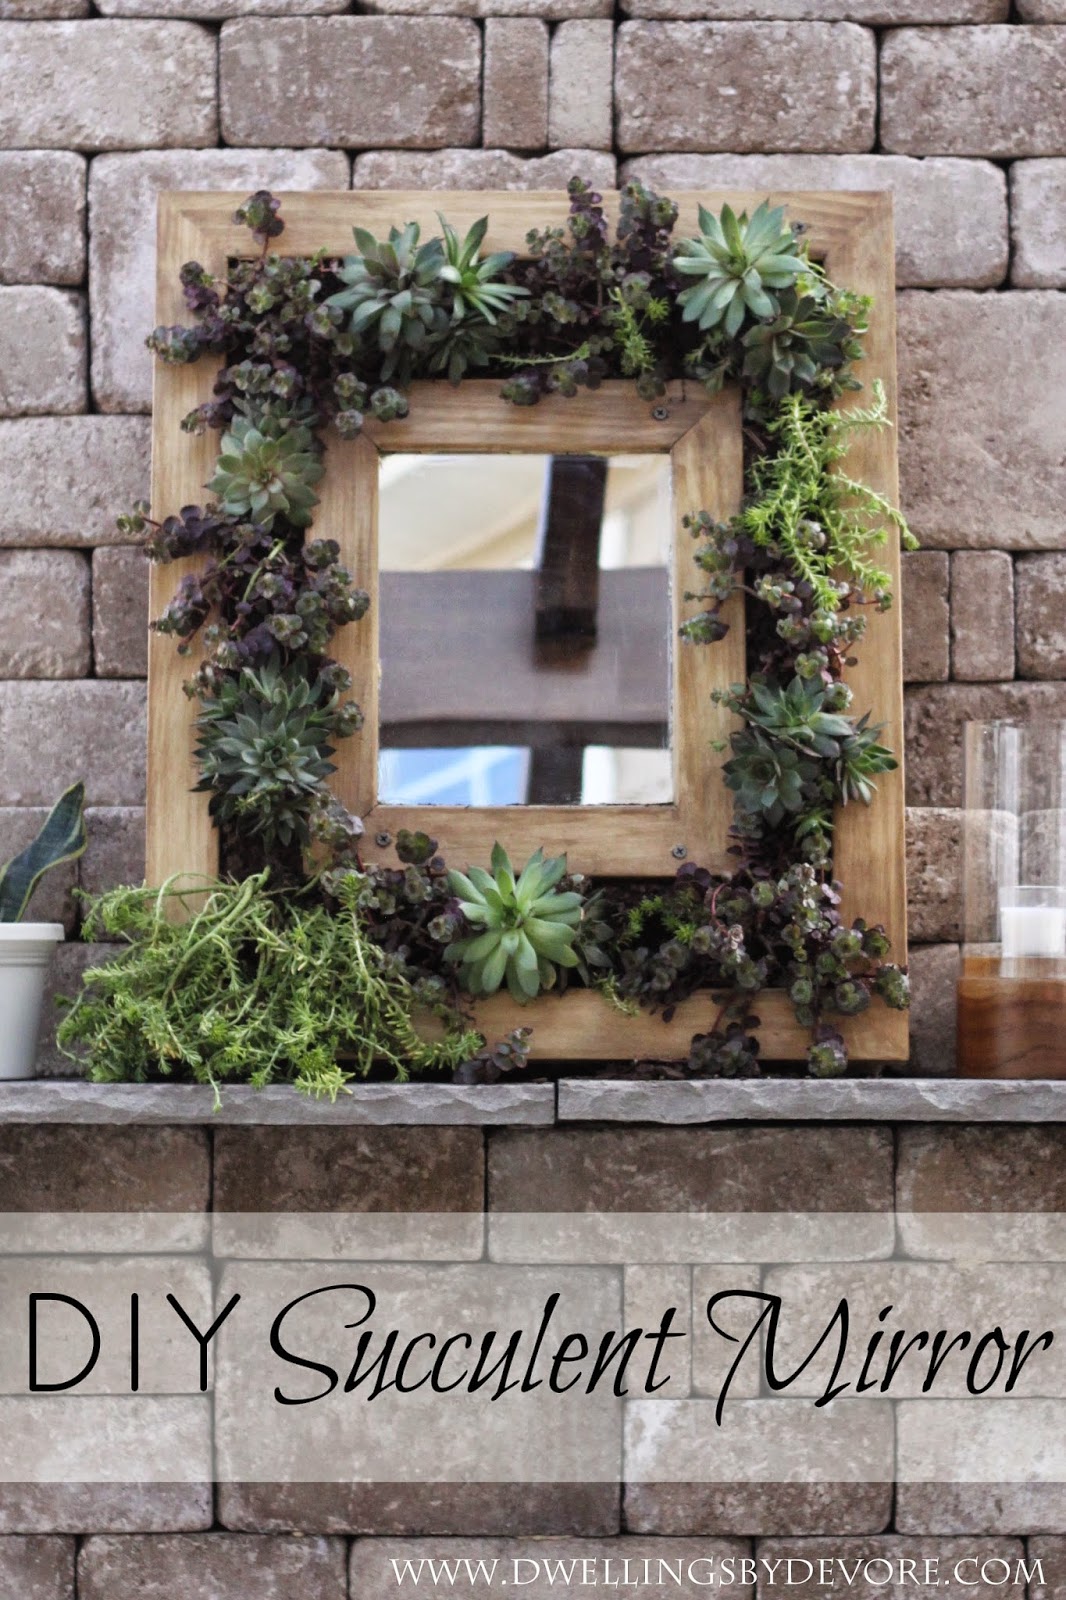
17. DIY Succulent Mirror
18. DIY Gem Mirror

19. DIY French Window Pane Mirror

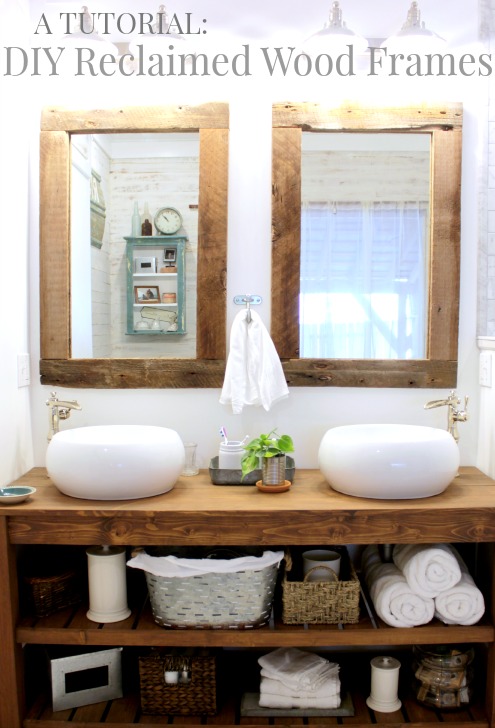
20. DIY Reclaimed Wood Frames
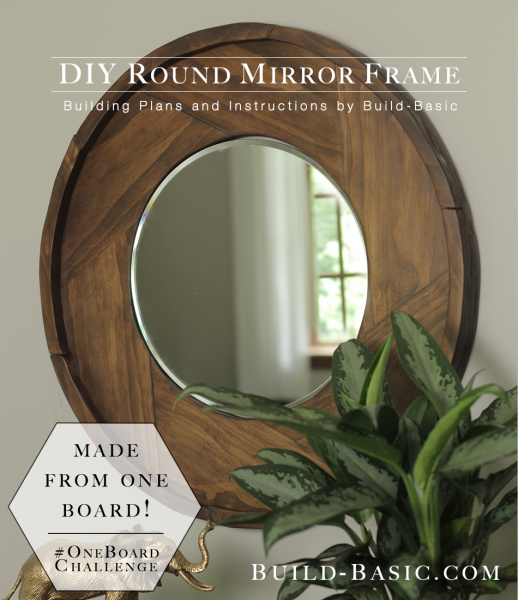
21. DIY Round Mirror Frame
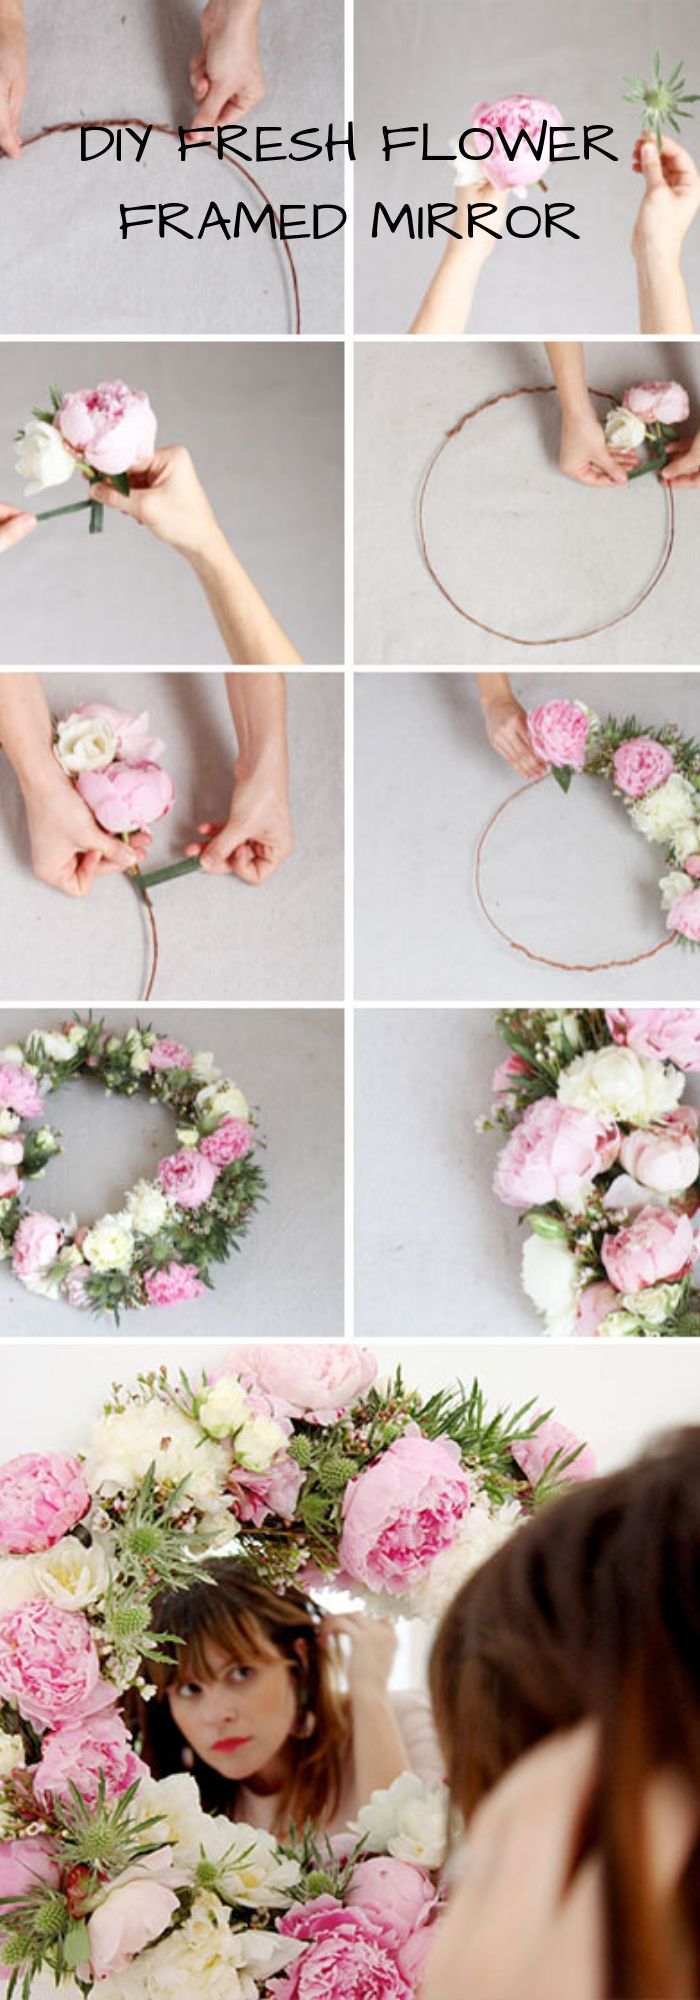
22. DIY Fresh Flower Framed Mirror
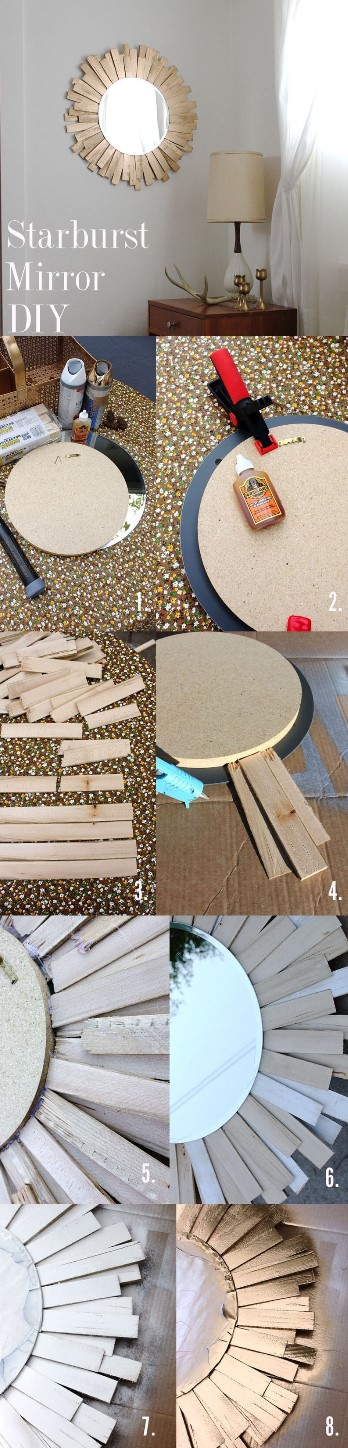
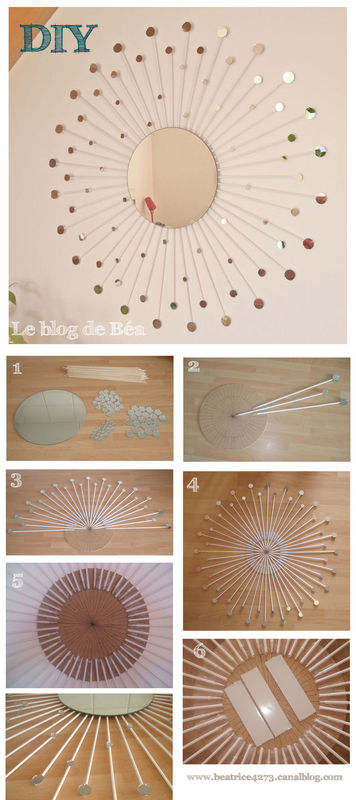
23. DIY Starbust Mirror
24. DIY Rope Mirror

25. DIY Beaded Mirror
26. DIY Starbust Driftwood Mirror
27. DIY Amethyst Mirror

28. DIY mirror constellation
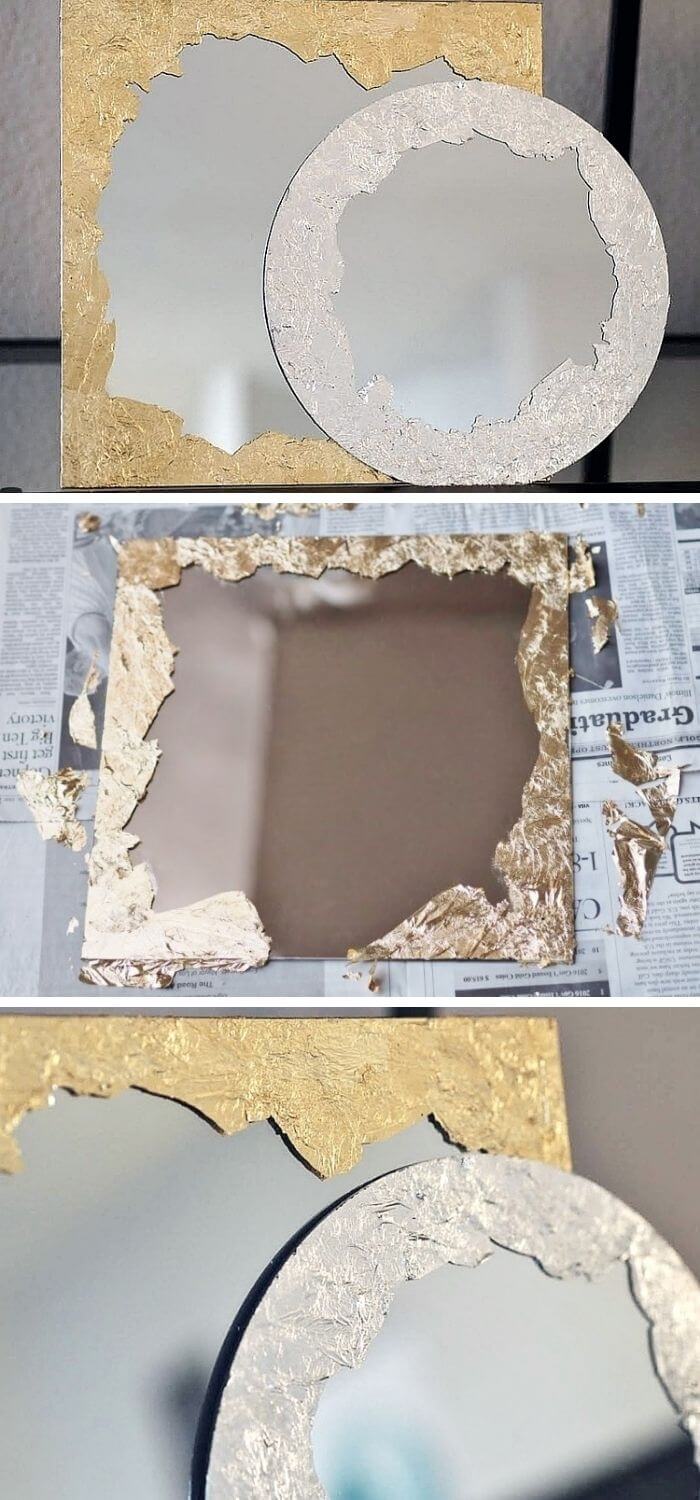
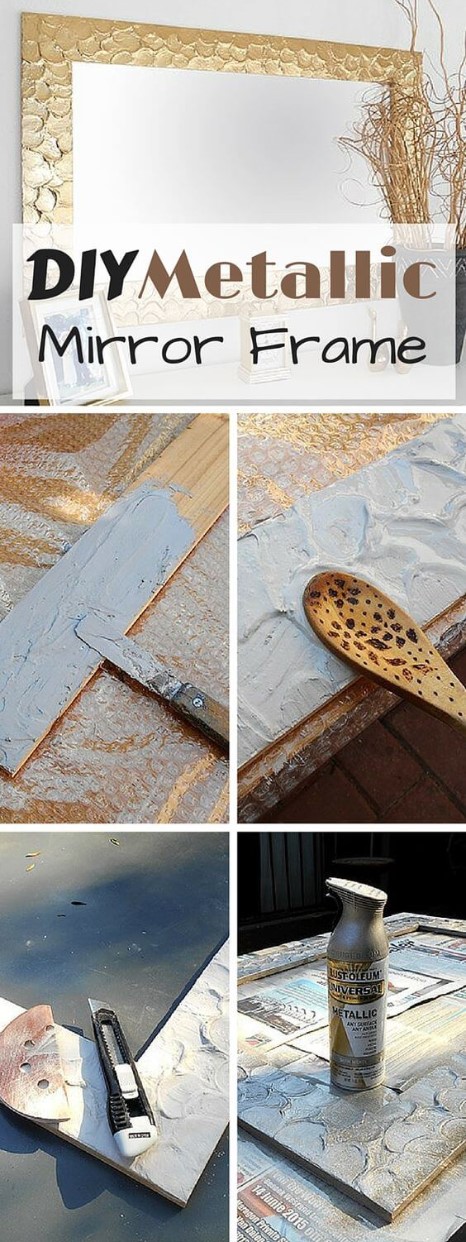
29. DIY Knock-off Metallic Mirror Frame
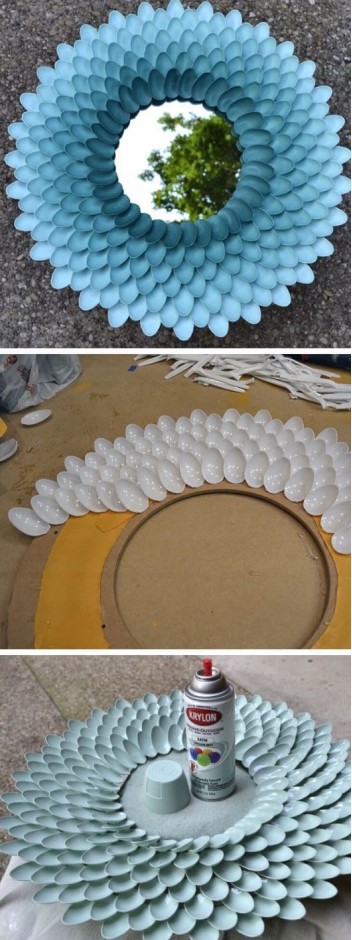
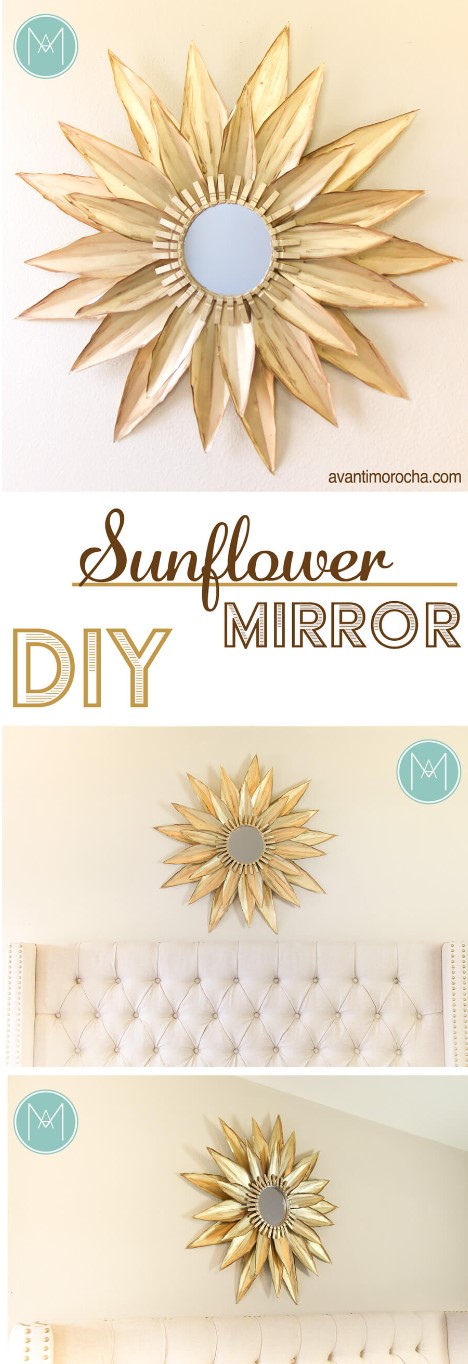
30. DIY Sunflower Mirror
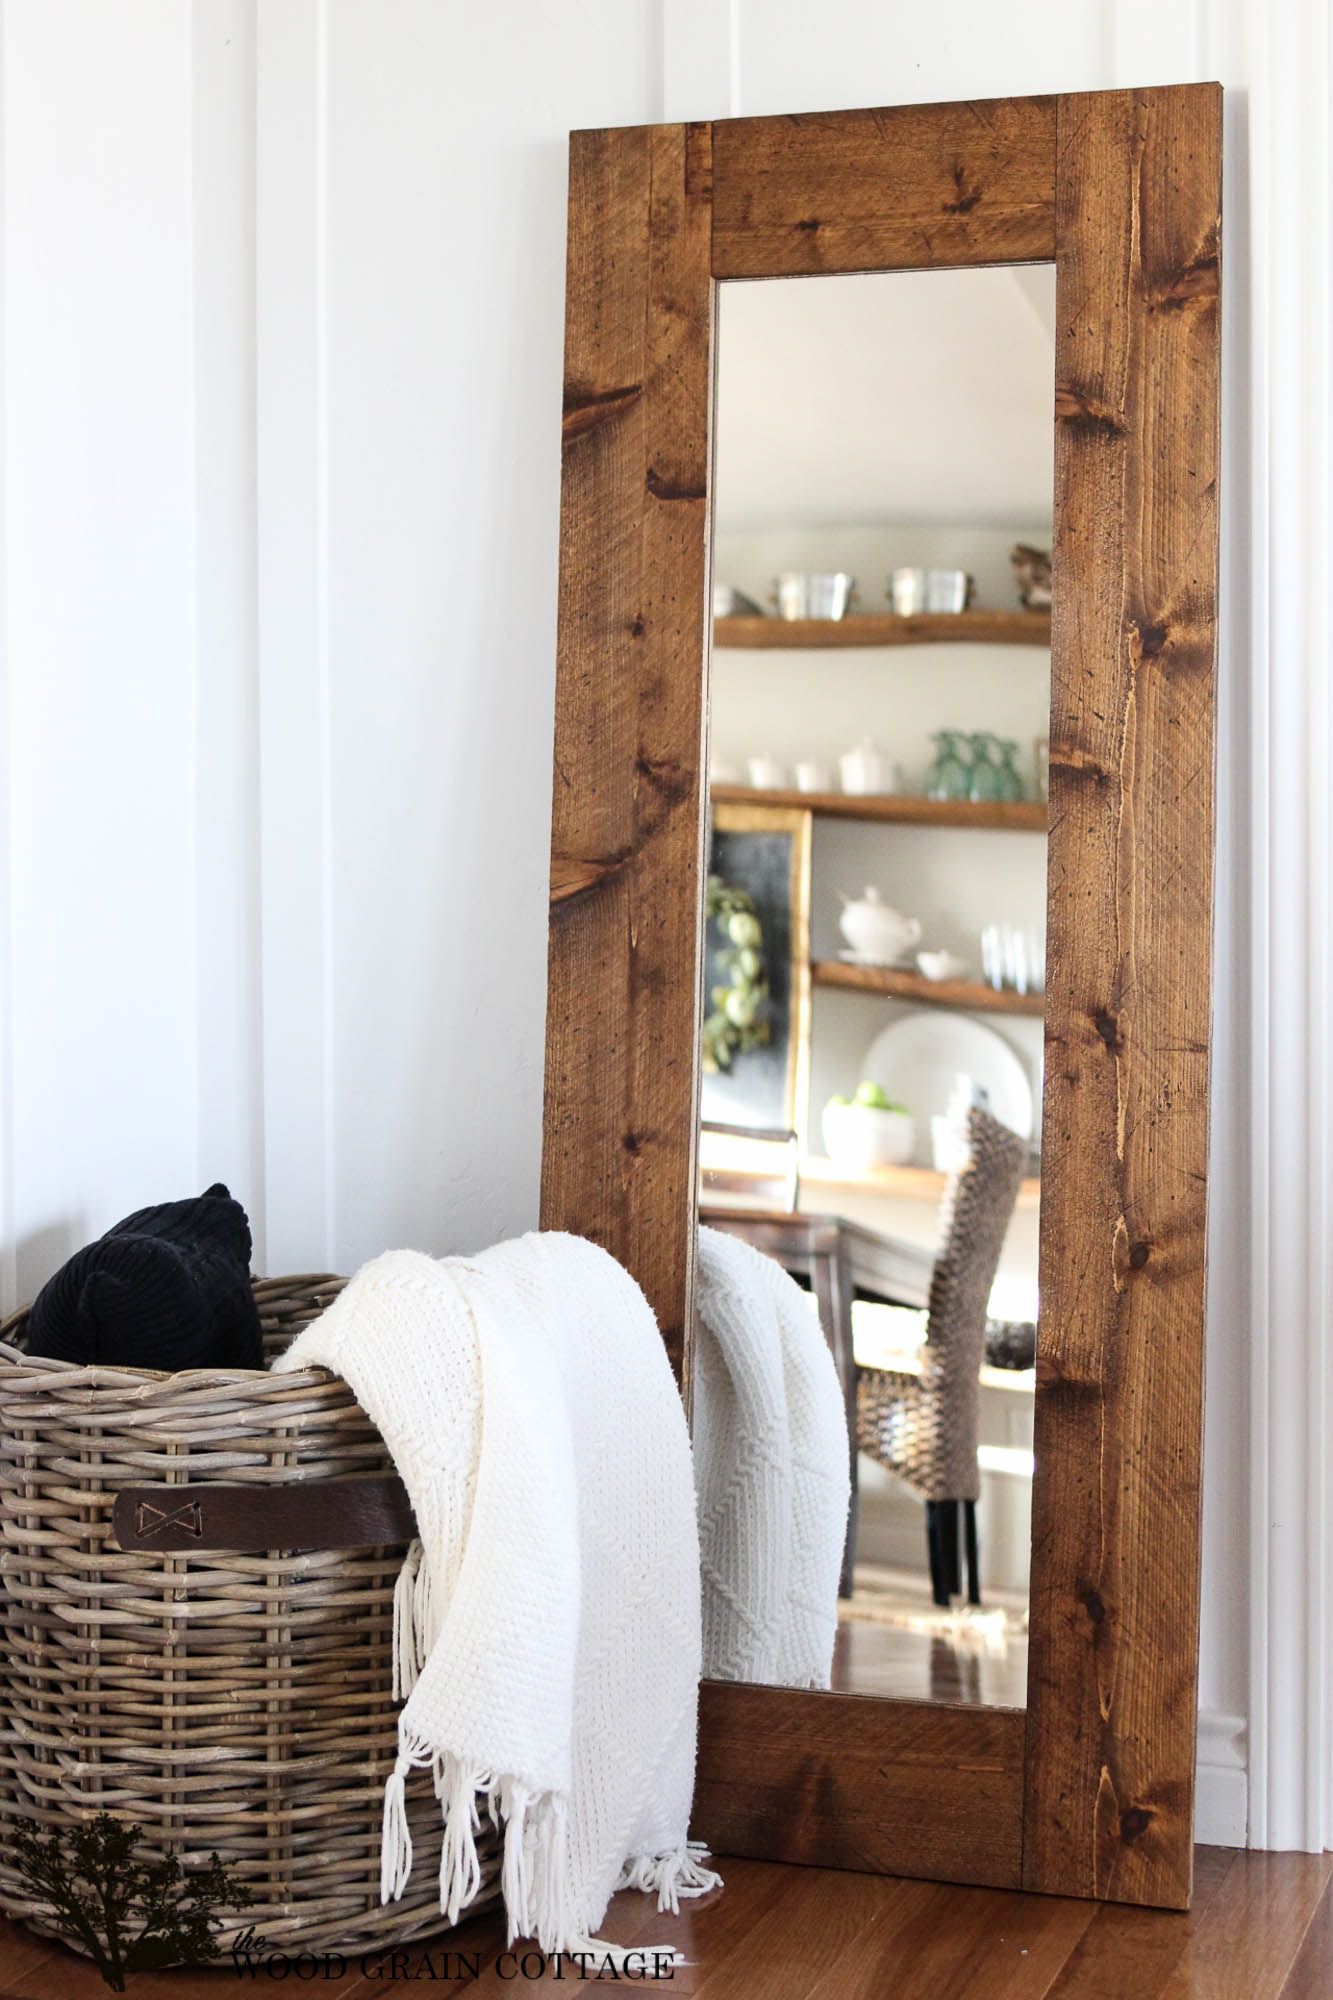
31. DIY Wood Framed Mirror
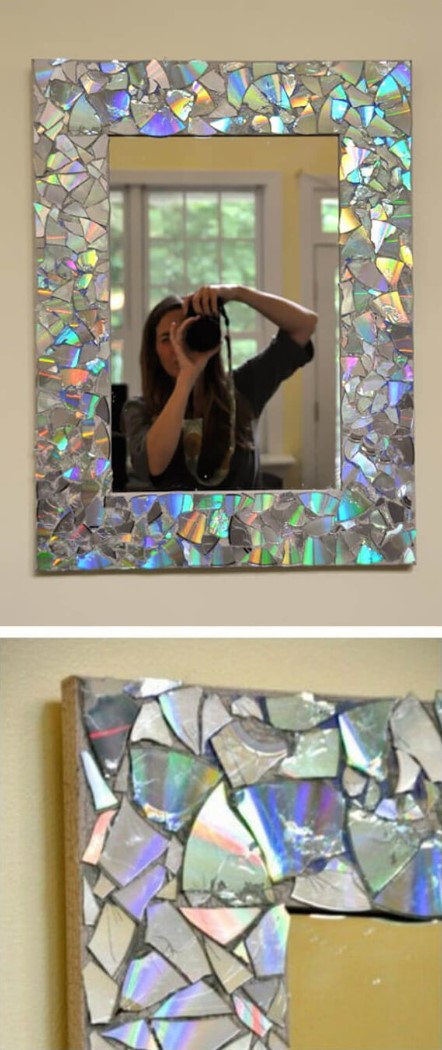
32. Broken CD Mirror
33. DIY Wood Slide Mirror
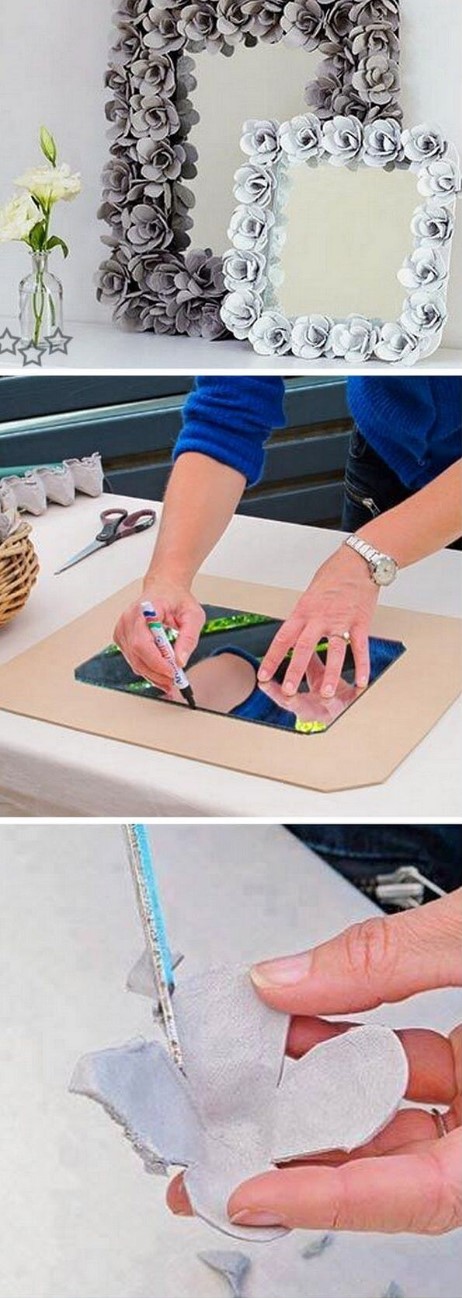
34. Egg Carton Flower Mirror Frame
35. Farmhouse Mirror

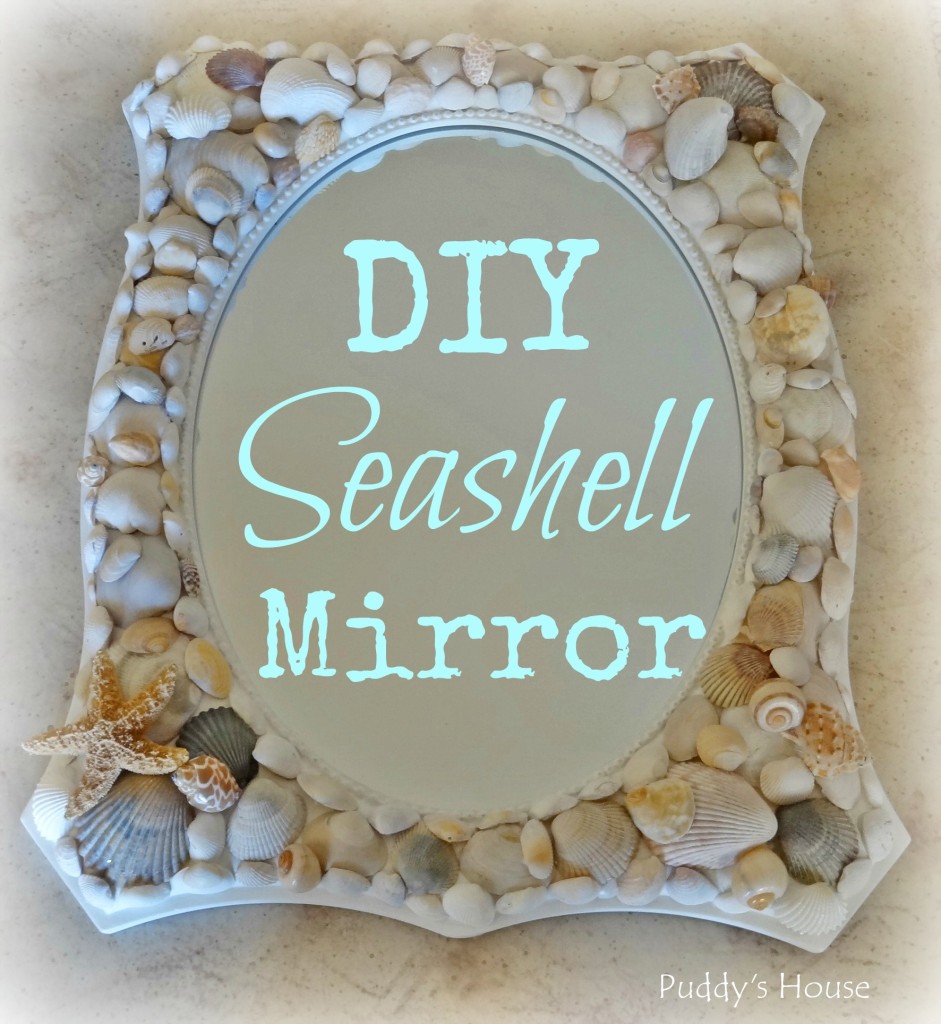
36. DIY Seashell Mirror