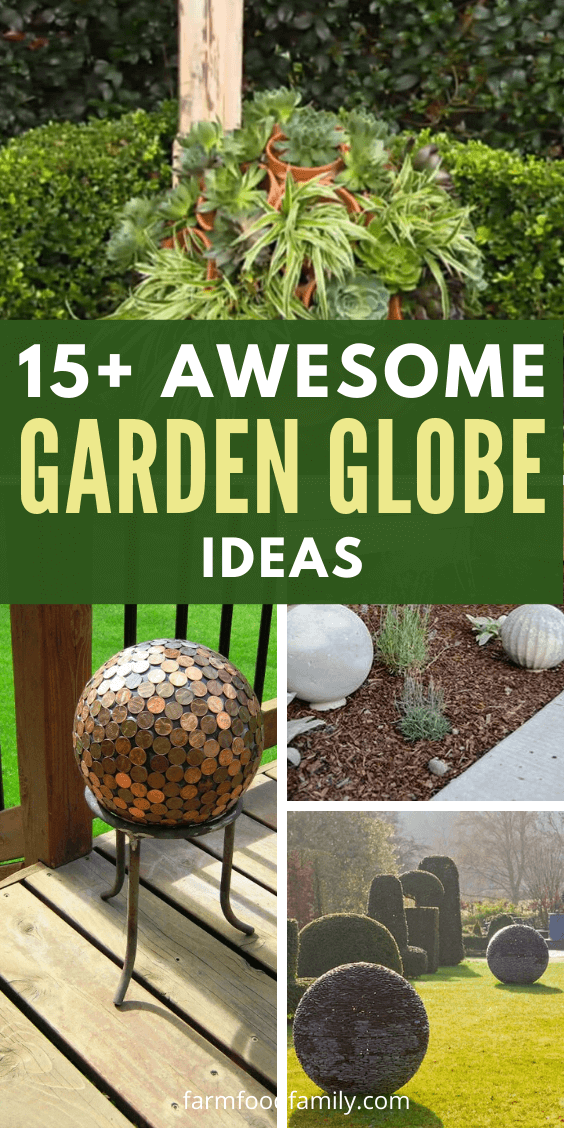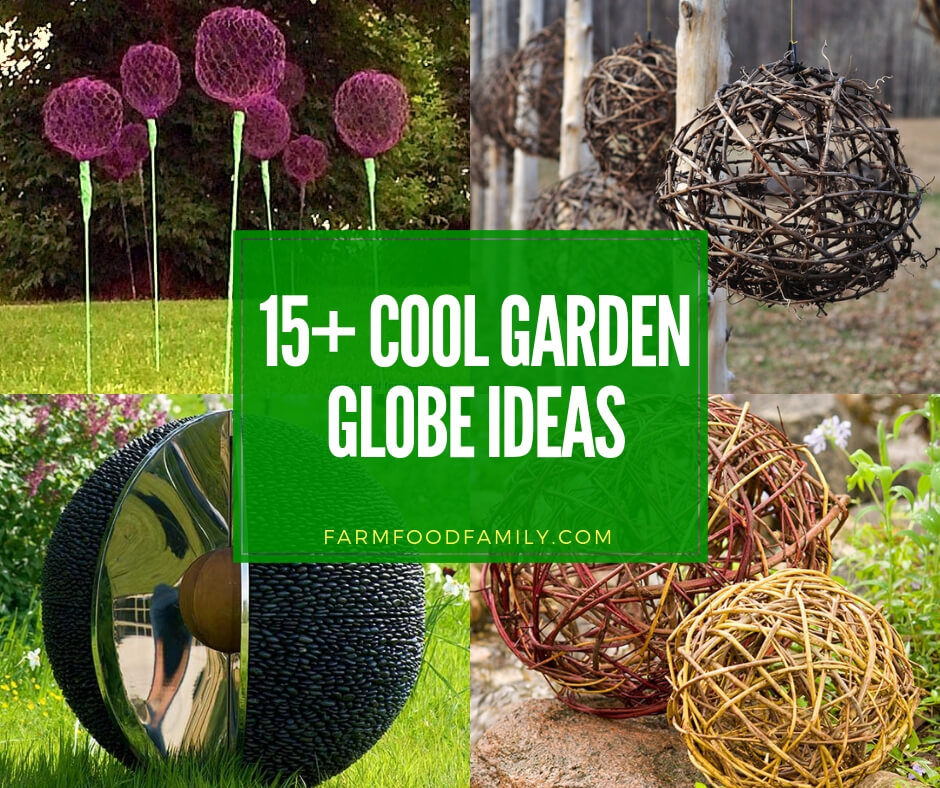
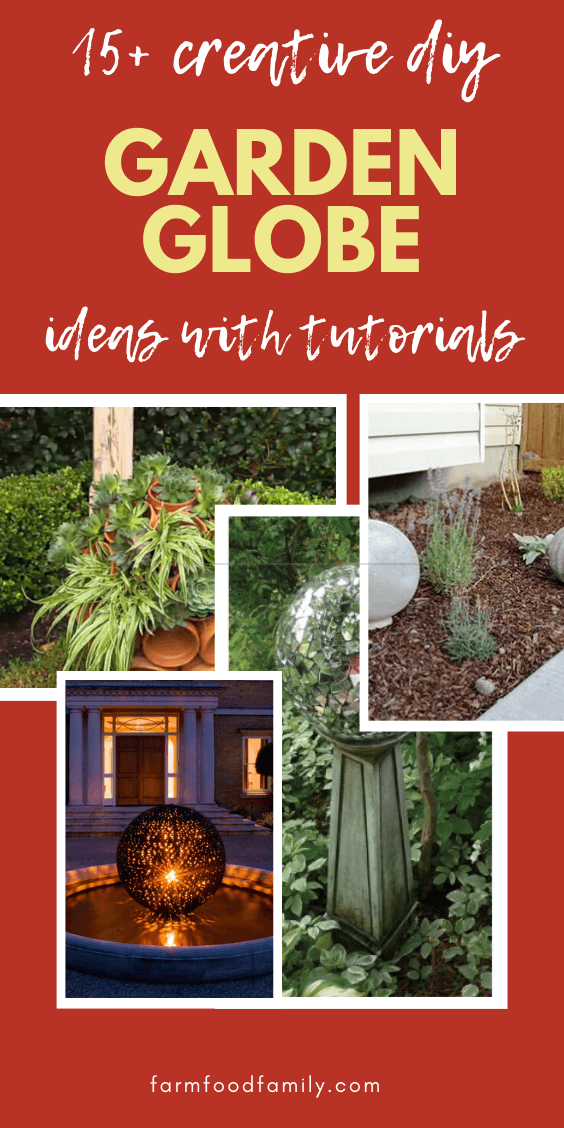
15+ Cool Garden Globe Ideas
Are you tired of your garden looking the same as everyone else’s? The key to transforming it into a unique and visually appealing oasis might just lie in incorporating garden globe ideas.
Garden globes, with their captivating shapes and colors, not only add a touch of elegance but also significantly enhance the beauty of outdoor spaces.
Their importance cannot be overstated; they bring life and a dynamic element to gardens that might otherwise lack visual interest. What makes these globes even more appealing is their versatility and the endless customization options they offer through DIY projects.
By choosing to create your own garden globes, you have the freedom to match them perfectly with your garden’s theme and style, making your outdoor space truly one-of-a-kind.
Related: Garden Ball Ideas
Understanding Garden Globes
Garden globes have a unique place in both history and modern landscape design. They are not just decorative items; they carry a blend of art, history, and personal expression into gardens. Let’s dive into what makes these pieces so special and how they can transform any outdoor space.
Definition and History
Garden globes, often seen as spheres of beauty, serve as focal points in gardens. Their roots trace back to the ancient times when orbs symbolized perfection and the universe.


Over centuries, these globes evolved from mystical symbols to popular decorative elements in gardens across the world. They reflect the gardener’s personality and bring a timeless elegance to the landscape.
Types of Garden Globes
Different materials and designs offer a wide range of looks and feels for garden globes. Here’s a quick overview of the most common types:
| Type | Material | Characteristic |
|---|---|---|
| Glass | Transparent or colored glass | Shiny and reflective, adding sparkle to the garden |
| Mosaic | Small pieces of glass or ceramic | Colorful and intricate, offering a unique charm |
| Metal | Iron, steel, or copper | Durable and rustic, with an industrial appeal |
| Illuminated | LED lights or solar-powered lamps | Adds a magical glow to the garden at night |
Each type of garden globe brings its own unique touch to garden spaces, from the reflective elegance of glass to the warm glow of illuminated globes.
The Role in Landscape Design
In landscape design, garden globes serve multiple purposes. They not only attract attention as decorative pieces but also create a sense of harmony and balance. By placing them strategically among plants and pathways, they can guide the eye, highlight specific areas, and even influence the mood of the garden.
Whether you prefer a classic, modern, or whimsical garden, incorporating a garden globe can enhance the overall aesthetic and feel of your outdoor space.
Incorporating garden globes into your landscape design is not just about adding a piece of decoration; it’s about bringing in elements that reflect your style and enhance the natural beauty of your garden.
With their rich history, variety, and role in design, garden globes offer endless possibilities to personalize and beautify your outdoor spaces.
Planning Your DIY Garden Globe Project
Before diving into creating your own garden globe, it’s essential to lay down a solid plan. This process ensures that your project aligns with your vision and fits perfectly within your garden’s existing layout and design. Let’s break down the crucial steps you need to consider.
Considerations Before Starting
The initial phase of your project involves careful consideration of several key factors:
| Consideration | Why It Matters | What to Think About |
|---|---|---|
| Location | Determines visibility and impact | Where will the globe catch the most eyes? |
| Size | Ensures the globe fits the space | Big enough to stand out, but not overpower |
| Materials | Affects durability and appearance | What best complements your garden’s style? |
| Theme | Guides the design choices | What vibe are you aiming for (e.g., modern, rustic)? |
Choosing the right location is crucial; you want your garden globe to enhance, not hinder, the beauty of your space. The size should complement the surrounding area, and the materials need to withstand the elements while reflecting your personal taste. Lastly, settling on a theme will guide the rest of your design decisions, making the process smoother.
Design Inspiration and Ideas
Now comes the fun part: getting inspired! Look for design ideas that resonate with your personal style and the atmosphere you want to create in your garden. Consider the following to spark your creativity:
- Color schemes: Do you prefer a monochrome look or a burst of color?
- Patterns: Geometric shapes, swirls, or nature-inspired patterns can add depth.
- Themes: Fairy tale, celestial, nautical, or botanical themes can guide your choice of materials and designs.
This is your chance to make your garden globe truly yours. Don’t hesitate to mix elements that appeal to you, even if they’re unconventional.
Gathering Materials and Tools Needed for the Project
Before you start, ensure you have all the necessary materials and tools. This preparation can save you time and frustration later on. Here’s a basic list to get you started:
| Material/Tool | Purpose | Example Use |
|---|---|---|
| Adhesive | To attach pieces together | Gluing mosaic tiles |
| Tiles/Glass/Metal | For the globe surface | Creating the globe’s exterior |
| Grout (if using mosaic) | To fill the spaces between tiles | Finishing a mosaic globe |
| Paint (optional) | For color or protection | Adding color or sealing metal |
| Gloves and safety glasses | For protection | Handling sharp materials |
Remember, the specific materials and tools will vary depending on the type of garden globe you plan to make. Always prioritize safety and quality to ensure your garden globe stands the test of time.
By thoughtfully planning your DIY garden globe project, considering all necessary aspects from the start, and gathering your materials and tools, you’re well on your way to creating a stunning piece that will add character and charm to your garden.
Step-by-Step DIY Garden Globe Projects
Creating a DIY garden globe is a fun and rewarding project that adds a personal touch to your outdoor space. Let’s dive into the first project: making a Mosaic Tile Garden Globe. This project blends artistry with gardening, offering a unique way to beautify your garden.

Project 1: Mosaic Tile Garden Globe
Materials List
Before starting, gather all the necessary materials to ensure a smooth and enjoyable crafting experience. Here’s what you’ll need:
| Material | Purpose | Quantity |
|---|---|---|
| Spherical Form | Base for the mosaic | 1 |
| Mosaic Tiles | Decorative elements | Varies |
| Adhesive | To attach tiles to the form | Sufficient amount |
| Grout | To fill gaps between tiles | Sufficient amount |
| Sealer | To protect the mosaic from weather | Sufficient amount |
| Gloves | For hand protection during work | 1 pair |
| Sponge & Cloth | For cleaning and polishing the globe | 1 each |
Ensure you choose a spherical form that fits the desired size of your garden globe. The quantity of tiles and grout will depend on the globe’s size and the tiles’ coverage area.
Step-by-Step Instructions
- Prepare the Spherical Form: Clean the surface to ensure it’s free of dust and grease. This helps the adhesive and tiles stick better.
- Plan Your Design: Lay out your tiles around the sphere to visualize the pattern or design you aim to create. It’s easier to make adjustments at this stage.
- Attach the Tiles: Apply adhesive to the back of each tile and press it onto the sphere. Start from the top and work your way down, leaving equal spaces between tiles for grout.
- Let It Dry: Allow the adhesive to dry completely, following the manufacturer’s recommended drying time, usually 24 hours.
- Apply Grout: Once the adhesive is dry, apply grout over the tiles, filling the gaps thoroughly. Use a glove or grout float to push the grout into the spaces.
- Clean the Surface: After applying the grout, wait for about 10 minutes, then gently wipe the surface with a damp sponge to remove excess grout. Be careful not to remove grout from between the tiles.
- Final Cleaning: Once the grout has fully set (usually after 24 hours), polish the tiles with a dry cloth to remove any haze left by the grout.
- Seal the Globe: Apply a sealer to the grout and tiles to protect your garden globe from weather and moisture. Follow the sealer’s instructions for the best results.
Tips for Grouting and Sealing
- Choose the Right Grout Color: Select a grout color that complements your tiles to enhance the overall appearance of your garden globe.
- Apply Sealer Correctly: Ensure the grout is completely dry before applying the sealer. Use a small brush for precise application, and don’t forget to reapply the sealer annually for lasting protection.
- Work in Sections: If your globe is large, consider working in sections to manage the drying times better and ensure each part receives the attention it deserves.
By following these steps and tips, you’ll create a stunning mosaic tile garden globe that reflects your style and adds a unique touch to your garden. This project not only enhances your outdoor space but also offers a satisfying sense of accomplishment.
Project 2: Illuminated Garden Globe
Creating an Illuminated Garden Globe is a magical way to bring light to your outdoor space. This project combines beauty with functionality, creating a warm and inviting atmosphere in your garden after dark.
Materials List
To begin, you’ll need to collect a few specific materials to ensure your illuminated garden globe not only looks good but is also safe and durable:
| Material | Purpose | Quantity |
|---|---|---|
| Waterproof Globe Shell | Base for the light | 1 |
| Solar Lights | To illuminate the globe | 1-2 units |
| Waterproof Adhesive | To secure the lights inside the globe | Sufficient amount |
| Sealant | To ensure the globe is waterproof | Sufficient amount |
| Drill (optional) | To make holes for lights, if required | 1 |
Choosing solar lights means you won’t need to worry about electrical cords, making this project both eco-friendly and safe.
Step-by-Step Instructions for Assembly
- Prepare the Globe: If your globe shell is not pre-drilled, carefully make a hole big enough for the solar light’s stake.
- Install Solar Lights: Insert the solar light into the globe. If it doesn’t fit snugly, use waterproof adhesive to secure it in place. Ensure the solar panel faces up to receive sunlight.
- Seal the Globe: Apply sealant around the edges where the light meets the globe to prevent water from entering. It’s crucial for the globe’s durability.
- Test the Light: Place the globe in sunlight to charge for a few hours, then check if it illuminates properly after dark. Adjust the solar panel’s angle if necessary for optimal light absorption.
- Final Placement: Once you’re satisfied with the lighting, place your globe in your desired location. Choose a spot where it can receive ample sunlight during the day and where its light can be best appreciated at night.
Safety Tips and Lighting Considerations
- Safety First: Always use materials suited for outdoor use to ensure the longevity of your garden globe and safety.
- Light Placement: Consider the solar panel’s placement carefully. It needs direct sunlight to charge effectively.
- Regular Maintenance: Clean the solar panel regularly to ensure it can absorb as much light as possible. Dust and dirt can significantly reduce its efficiency.
- Waterproofing: Make sure every part of the globe that could be exposed to water is sealed properly. This step is crucial to prevent damage to the light and ensure the globe is safe to use outdoors.
By following these steps, you create not just a decorative element for your garden but also a practical light source that enhances the beauty of your outdoor space at night. An Illuminated Garden Globe offers a perfect blend of aesthetics and functionality, bringing a cozy ambiance to your garden that you and your visitors will enjoy.
Project 3: Metallic Garden Globe
Crafting a Metallic Garden Globe can add a sleek and modern touch to your garden. This project is not only an opportunity to get creative but also to recycle materials, making it eco-friendly and cost-effective.
Materials List
Starting with the right materials is crucial for creating a durable and attractive metallic garden globe. Here’s what you’ll need:
| Material | Purpose | Quantity |
|---|---|---|
| Old Bowling Ball or Spherical Form | Base for the globe | 1 |
| Metal Sheets or Strips | To cover the sphere | Varies |
| Metal Primer | To prepare the surface for painting | Sufficient amount |
| Metal Paint | To give color and protect the surface | Sufficient amount |
| Sealant | To prevent rust and enhance durability | Sufficient amount |
| Adhesive | To attach metal pieces to the sphere | Sufficient amount |
Recycling old metal sheets or strips can give them a new life as part of your garden decor.
Instructions for Preparation and Painting
- Prepare the Base: Clean your bowling ball or spherical form to ensure it’s free of dirt and grease. This helps the adhesive and paint adhere better.
- Attach Metal Pieces: Cut the metal sheets or strips to size and use adhesive to attach them to the sphere. Overlap pieces slightly for full coverage.
- Apply Primer: Once the adhesive is dry, apply a coat of metal primer to the entire surface. This step is crucial for preventing rust and ensuring that the paint adheres properly.
- Paint the Globe: After the primer has dried, apply your chosen color of metal paint. For best results, apply two or more thin coats, allowing each coat to dry thoroughly before applying the next.
- Seal the Globe: To protect your globe from the elements and prevent rust, apply a clear sealant over the painted surface. Ensure the sealant is suitable for outdoor use and compatible with metal.
Finishing Touches to Prevent Rust and Enhance Durability
- Regular Maintenance: Check your globe periodically for signs of wear or rust. Touch up paint and sealant as needed to maintain its appearance and durability.
- Proper Placement: Place your globe in a part of the garden where it can be admired but is not likely to be damaged by heavy rain or strong winds.
- Use Quality Materials: Choosing high-quality paint and sealant designed for metal and outdoor use can significantly extend the life of your metallic garden globe.
Creating a Metallic Garden Globe is a fantastic way to introduce a modern and industrial element to your garden. By following these steps, you’ll have a beautiful, durable piece that reflects your creativity and commitment to recycling.
1. DIY Concrete Garden Orbs
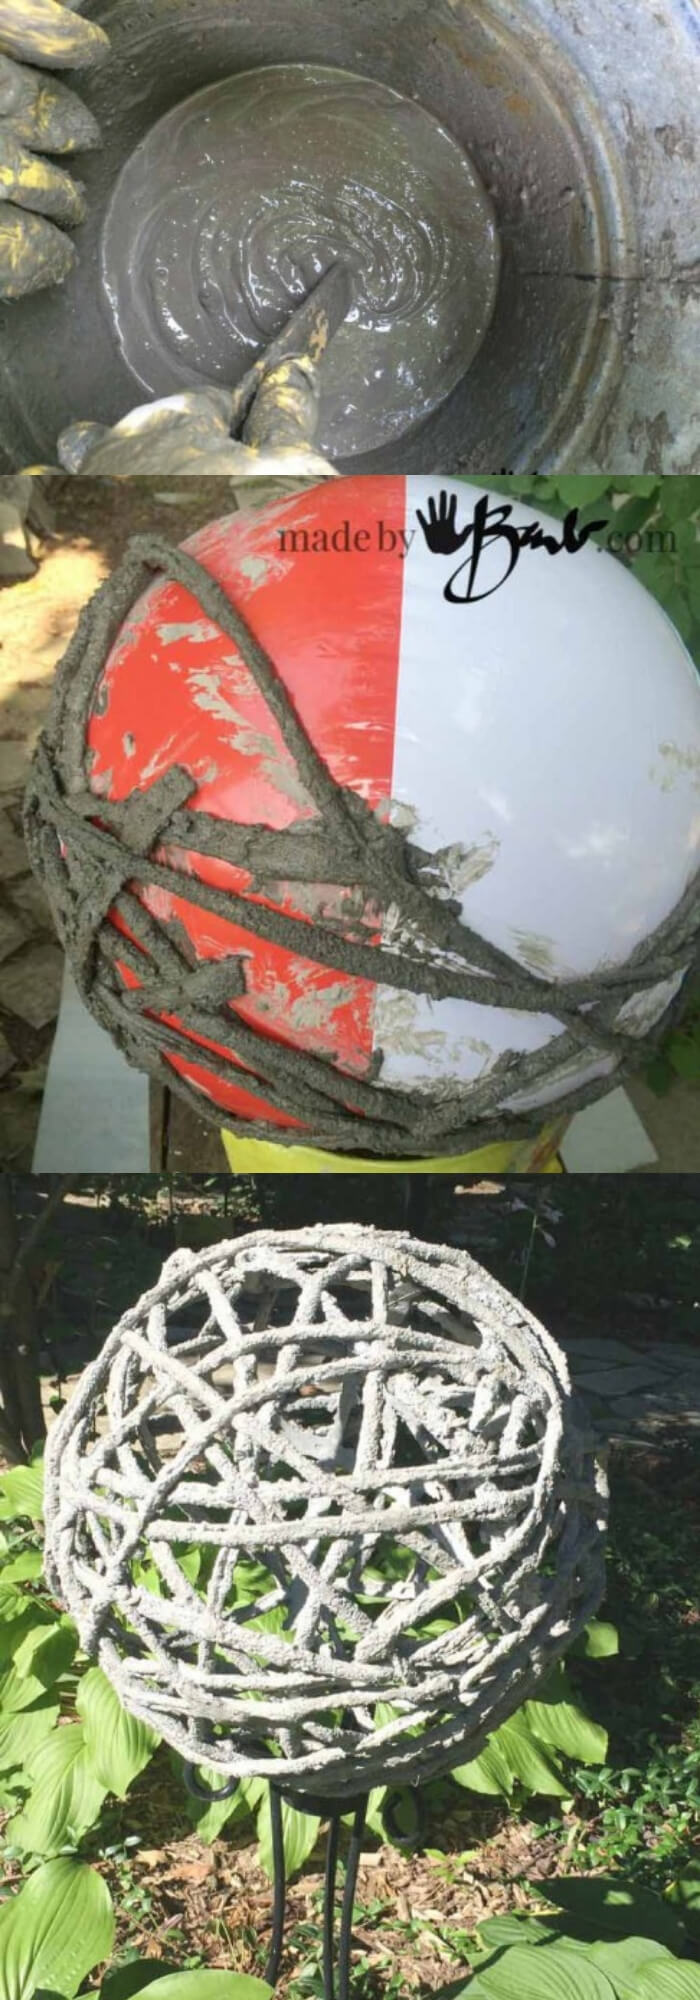
The idea behind Concrete Garden Orbs as presented by madebybarb.com focuses on creating durable, aesthetic elements for garden decoration using concrete.
The creator, Barb, shares a comprehensive guide on how to craft these orbs, emphasizing the simplicity and versatility of concrete as a medium.
Insight from Barb highlights the satisfaction derived from creating functional art that enhances outdoor spaces, and the project reflects her passion for DIY crafts that anyone can undertake to personalize their garden. For detailed instructions and insights, visit madebybarb.com.
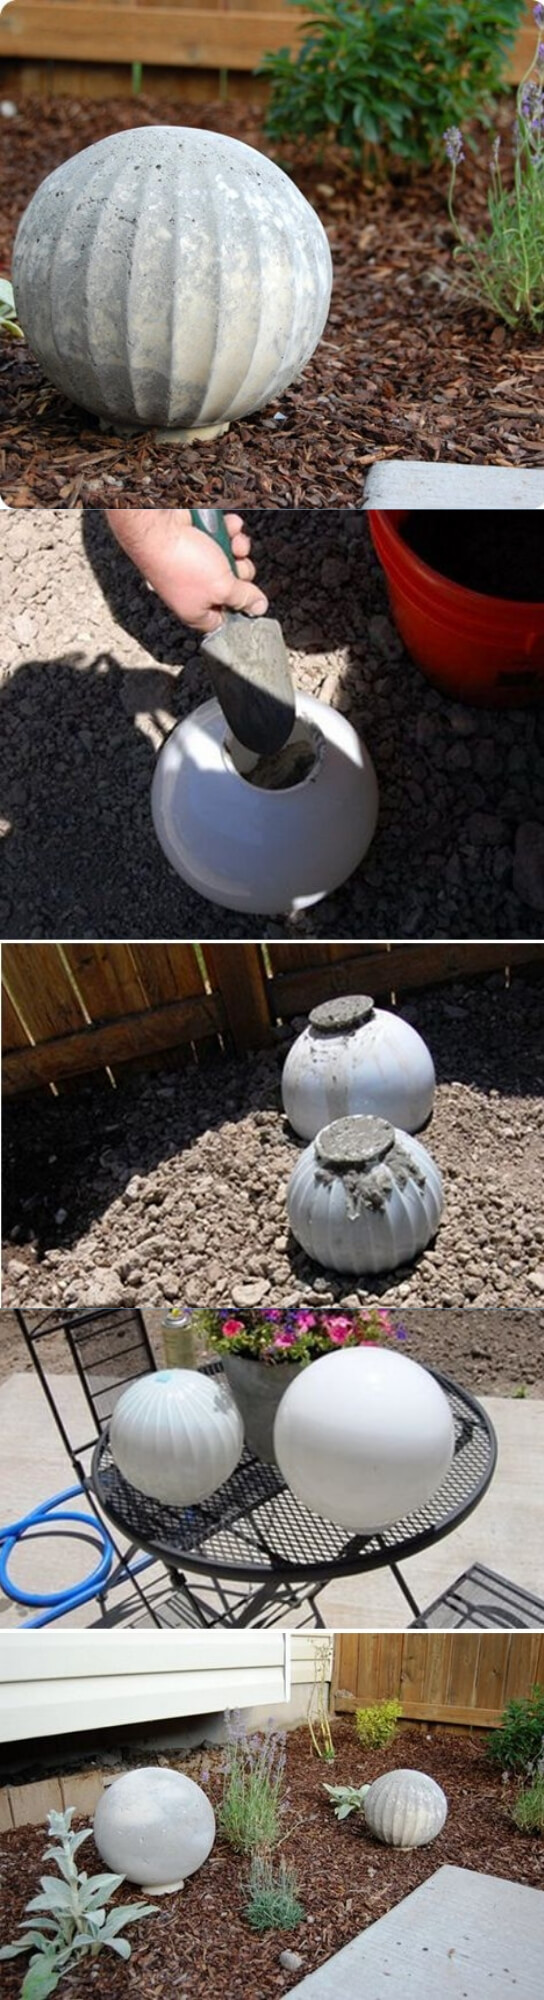
2. DIY Concrete garden spheres
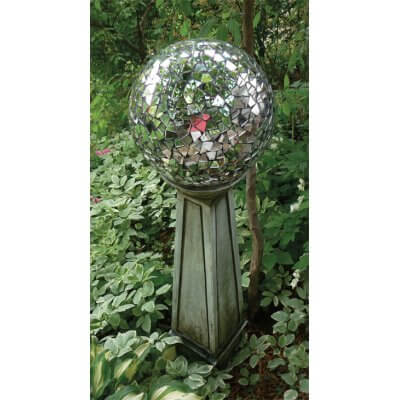
3. Garden Party Mosaic Mirror Ball
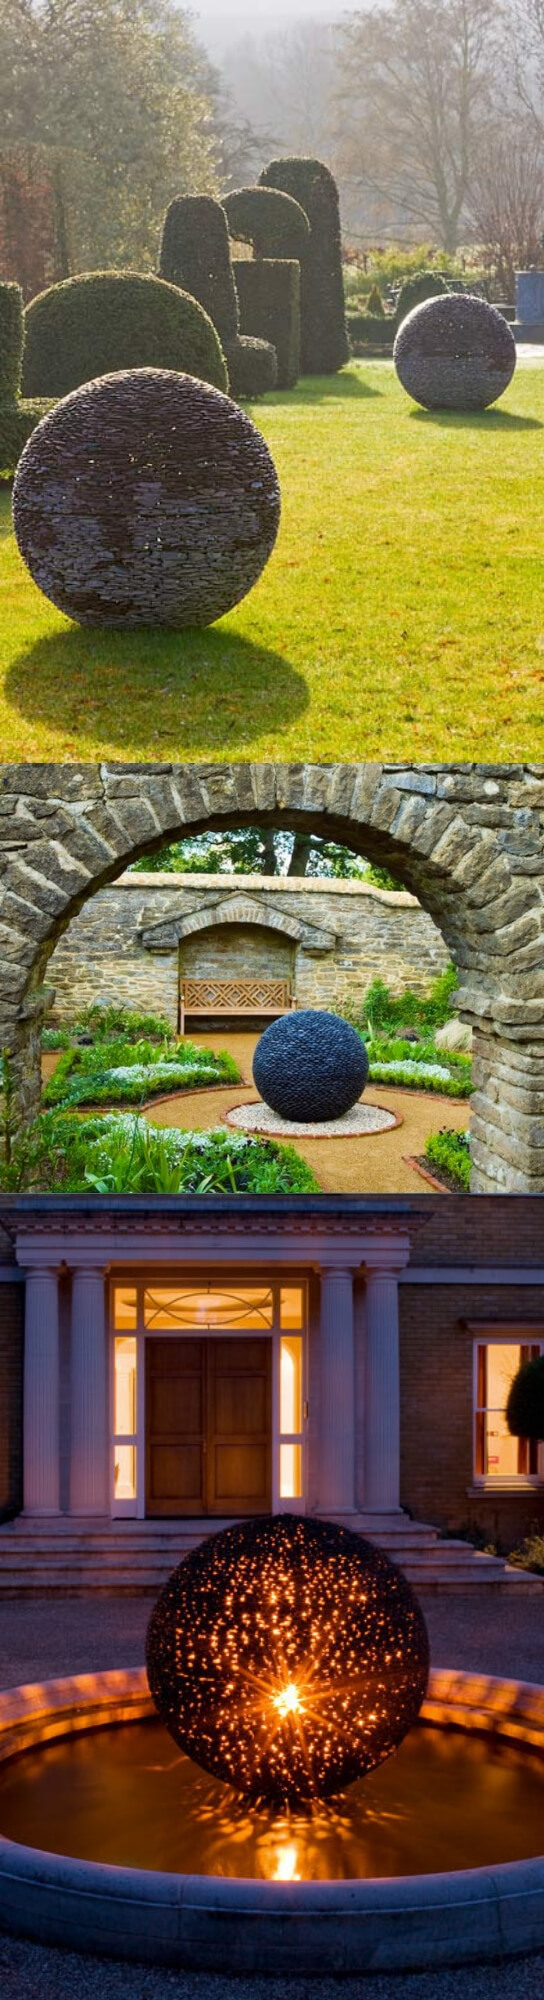
4. Garden Symmetrical Spheres from River Stones
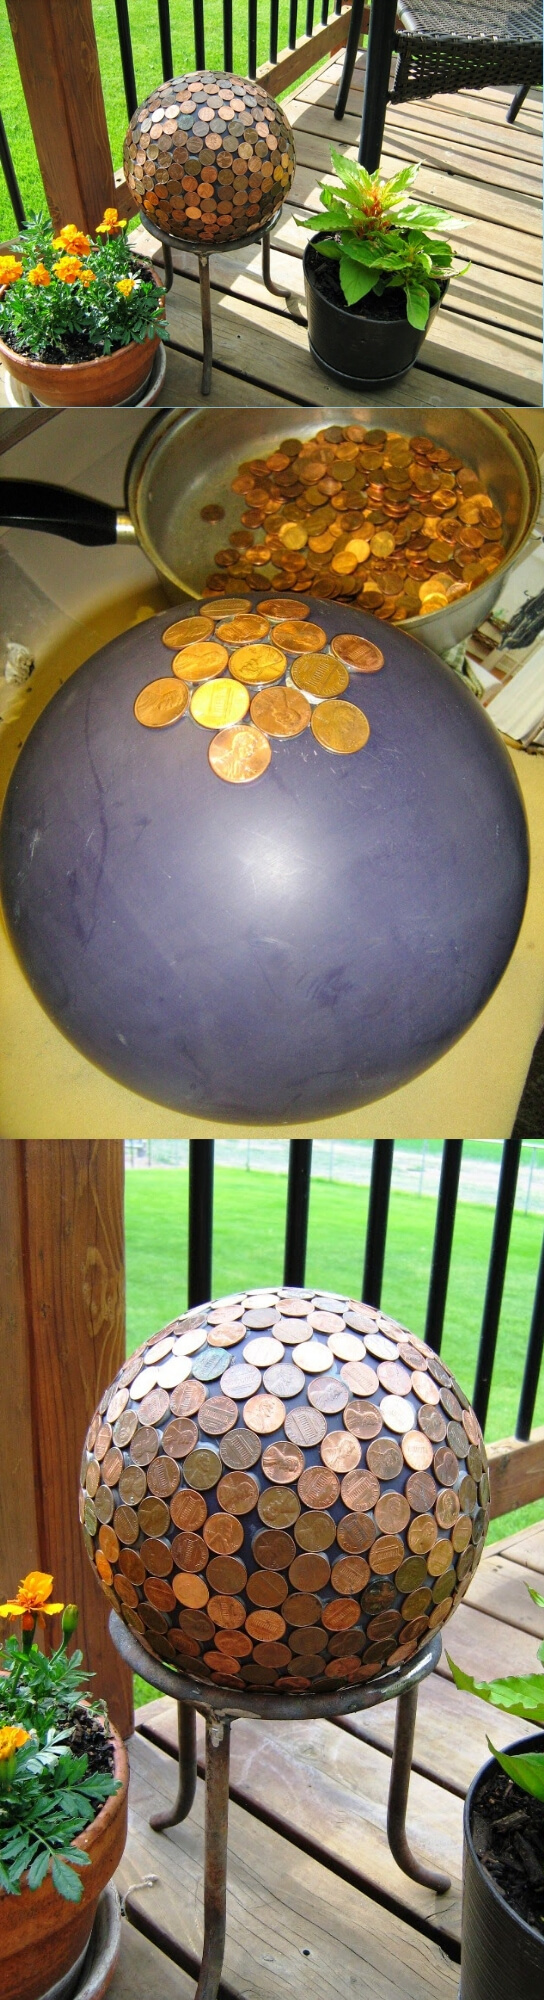
5. A Penny Ball
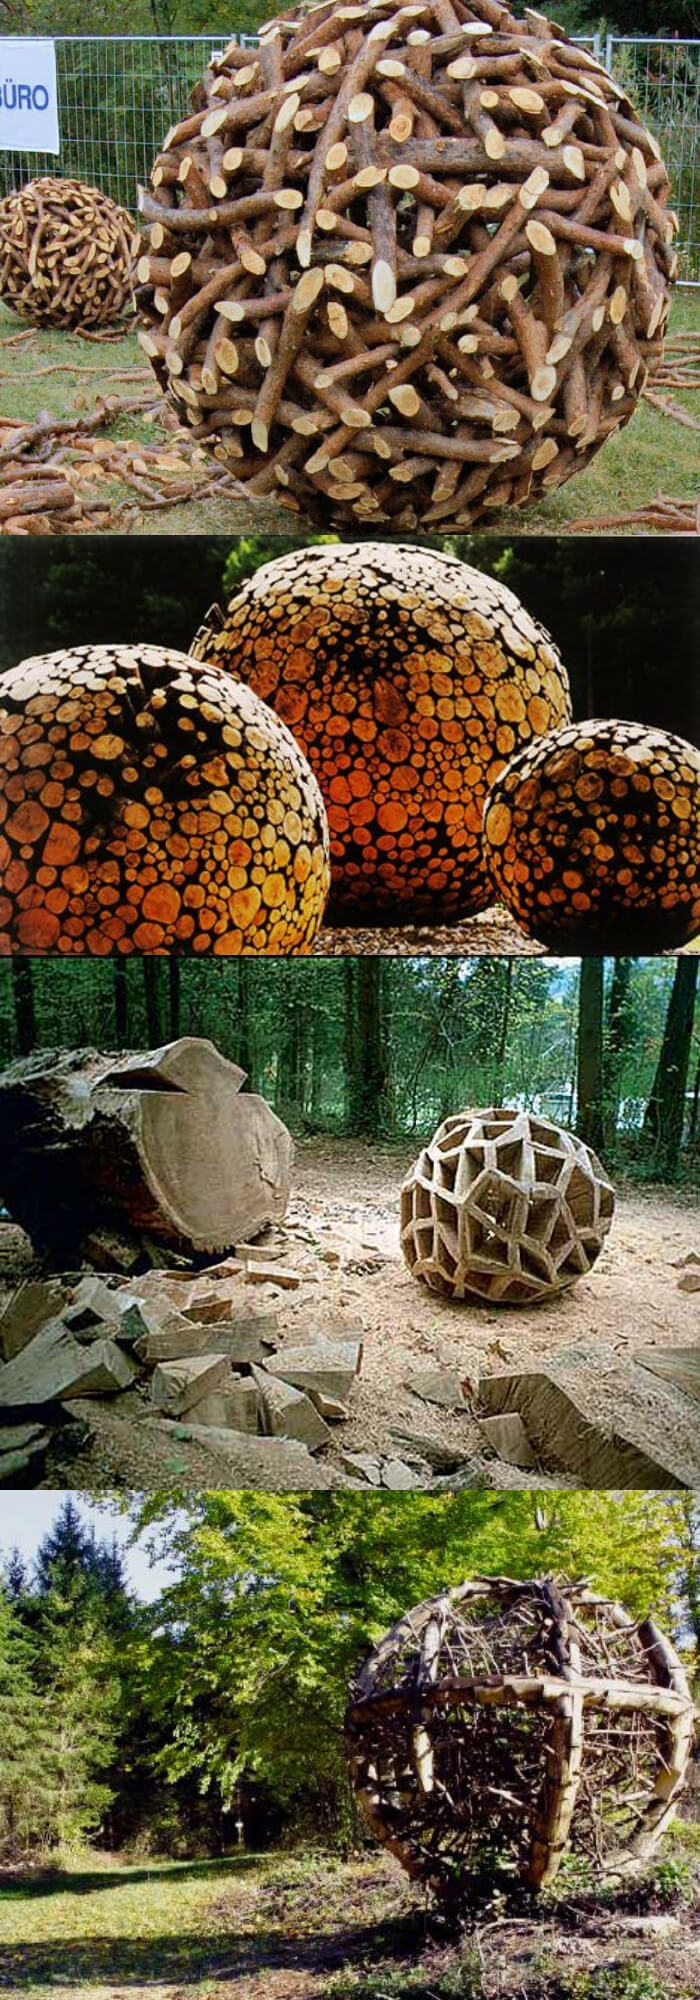
6. Wood spheres
7. DIY Terracotta Garden Art

8. DIY Topiary

Source: doityourself, 2beesinapod
9. DIY Gabion Globes

10. Giant concrete balls

Source and ashbeedesign
11. Grapevine Balls

12. Black Stone Outdoor Spheres with Stainless Steel

13. Metal Garden Balls Spheres

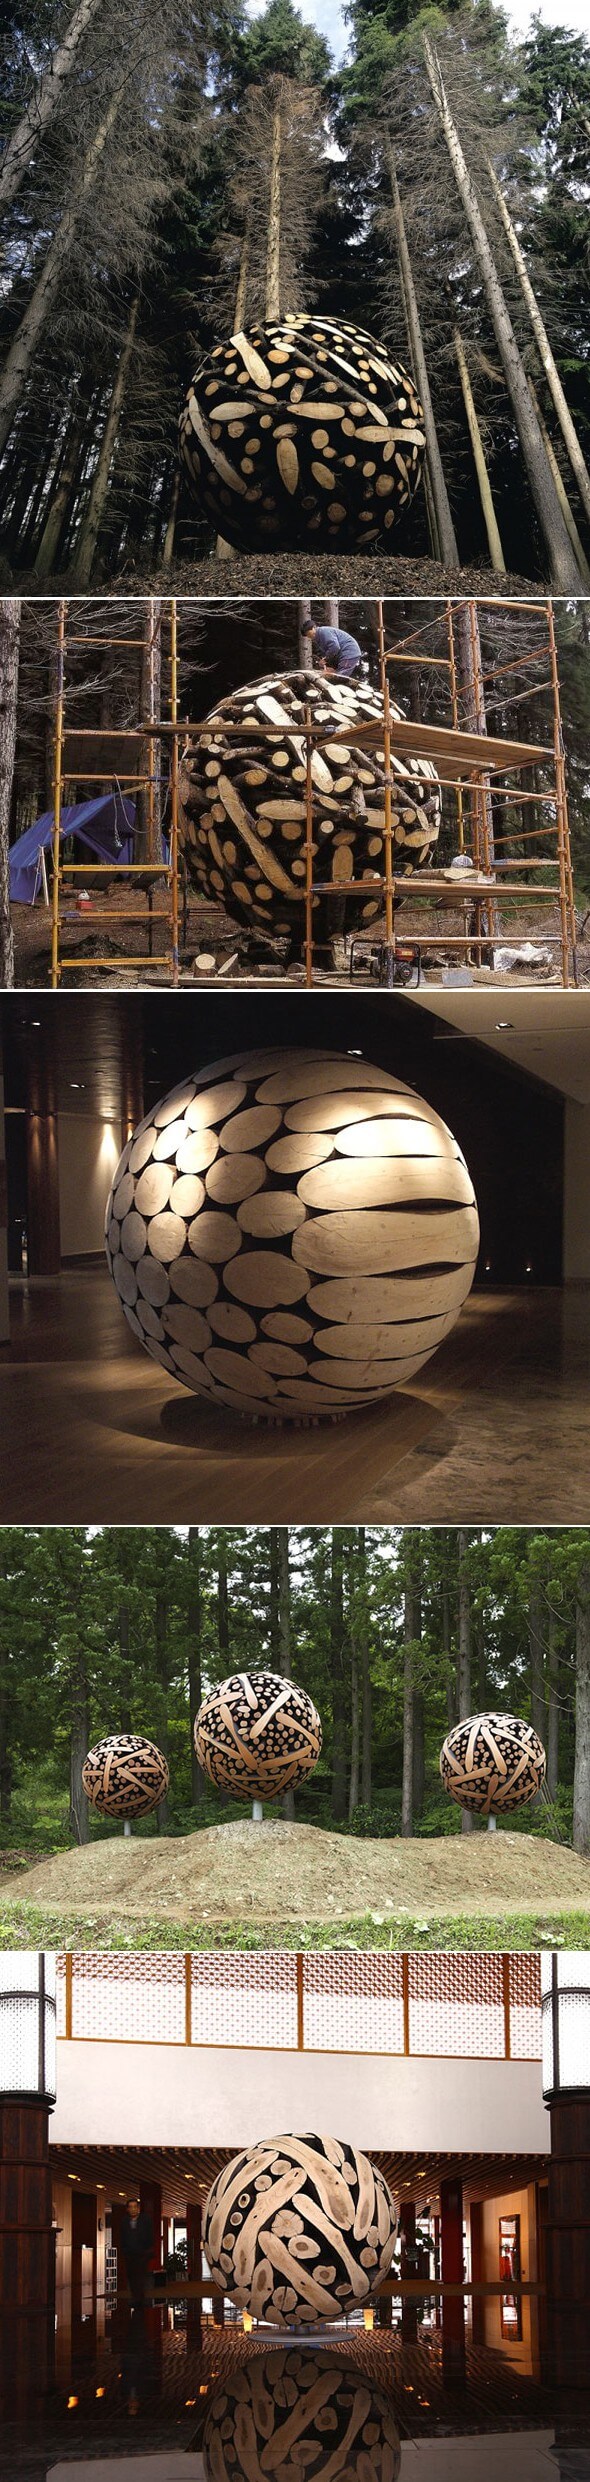
14. Giant Wooden Spheres
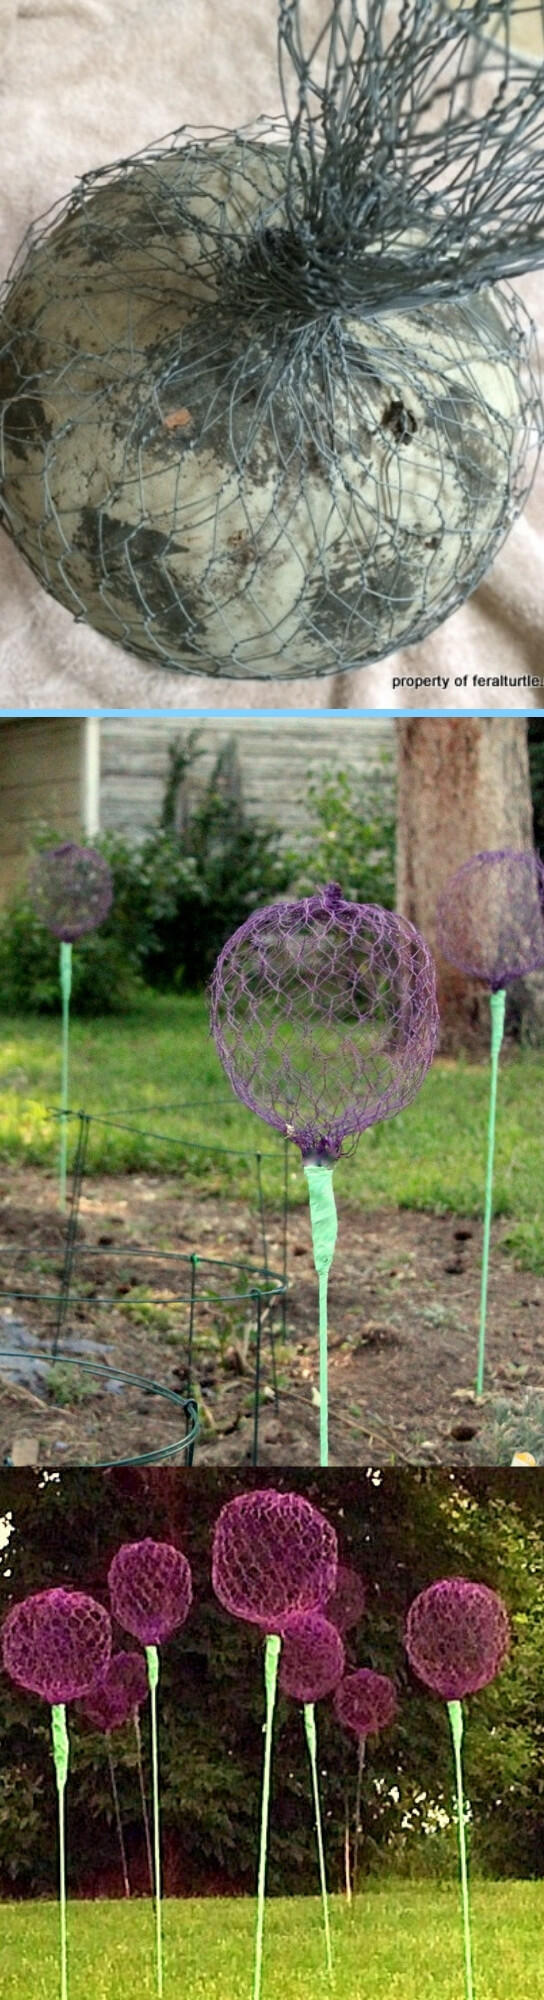
15. Giant Allium Chicken Wire Flowers
Customizing Your Garden Globe
Tailoring your garden globe to match your personal style or garden theme can transform it from a simple ornament into a standout feature. Here are some tips and ideas to help you make your garden globe uniquely yours.
Ideas for Personalizing Garden Globes
Personalizing your garden globe involves adding unique touches that reflect your personality or the essence of your garden. Consider these options:
| Customization | Technique | Impact |
|---|---|---|
| Engravings | Carving names, dates, or patterns | Adds a personal or commemorative touch |
| Patterns | Using stencils or freehand designs | Creates visual interest and theme consistency |
| Color Themes | Selecting specific paint colors | Aligns with garden color schemes or seasons |
Engraving your garden globe can turn it into a lasting keepsake, especially if it commemorates a special event or person. Applying patterns, whether geometric, floral, or abstract, adds depth and interest, making your globe a focal point. Choosing a color theme that complements your garden’s palette or seasonal changes can enhance the overall harmony of your outdoor space.
Incorporating Garden Globes into Different Garden Styles
Garden globes can fit into any garden style, enhancing the space’s aesthetic and atmosphere. Here’s how you can integrate them into various garden themes:
| Garden Style | Globe Feature | Suggested Approach |
|---|---|---|
| Modern | Sleek, minimalistic design | Use metallic or monochromatic globes |
| Rustic | Natural materials and textures | Opt for stone, mosaic, or wood-look globes |
| Fairy Gardens | Whimsical and enchanting elements | Choose small, colorful, and illuminated globes |
For a modern garden, a globe with a sleek design and neutral colors will complement the minimalist aesthetic. Rustic gardens benefit from globes made with or mimicking natural materials, adding to the garden’s earthy feel. Fairy gardens, meant to enchant and delight, are perfect for small, brightly colored globes that seem to have sprung from a magical world.
Seasonal and Themed Decoration Tips
Decorating your garden globe according to the season or specific themes can keep your garden looking fresh and in tune with the changing times of the year or special occasions:
| Season/Event | Decoration Idea | Materials |
|---|---|---|
| Spring | Floral patterns and pastel colors | Paints, decals |
| Halloween | Spooky designs, orange and black colors | Temporary paints, lights |
| Christmas | Red and green colors, snowflake patterns | Ribbons, waterproof glitters |
For spring, adorning your globe with floral patterns or wrapping it in pastel-colored ribbons can echo the garden’s rebirth. Halloween offers the chance to transform your globe into a night-time spectacle with eerie lights and spooky faces. During Christmas, dressing up your globe in traditional holiday colors and patterns can add to the festive spirit.
Customizing your garden globe allows it to reflect your personal style, complement your garden’s theme, and adapt to different seasons and celebrations. With a bit of creativity and effort, your garden globe can become a cherished part of your garden’s landscape.
Installation and Maintenance
Proper installation and regular maintenance of your garden globe can greatly enhance its appearance and longevity. Here are some essential tips to help you maximize the impact of your garden globes and keep them looking their best through the seasons.
Advice on Positioning Garden Globes for Optimal Impact
Positioning your garden globe thoughtfully within your garden can significantly affect its visual appeal and the overall ambiance of your outdoor space.
| Factor | Consideration | Suggestion |
|---|---|---|
| Visibility | Ensuring the globe is easily seen | Place at eye level or in a clear line of sight |
| Lighting | Maximizing light exposure | Position in sunny areas or under garden lights |
| Surroundings | Complementing the garden’s features | Near colorful flowers or reflective surfaces |
Placing your globe at eye level or in a direct line of sight ensures it attracts attention and becomes a focal point. For illuminated globes, positioning them in sunny areas during the day or under artificial garden lights can enhance their glow and magical appeal in the evening.
Additionally, placing globes near complementary garden features, like colorful flowers or alongside a pond, can amplify their beauty and the overall aesthetic of your garden.
Maintenance Tips to Ensure Longevity
Regular maintenance is crucial to preserve the beauty and integrity of your garden globe. Here are some tips to keep your globe in top condition:
| Maintenance Task | Purpose | Frequency |
|---|---|---|
| Cleaning | To remove dirt and prevent staining | As needed or at least monthly |
| Inspection | To check for damage or wear | Bi-annually (spring and fall) |
| Winter Storage | To protect from freezing temperatures | Before the first frost |
Regular cleaning with mild soap and water can keep your globe looking vibrant. It’s also important to inspect it periodically for any signs of wear, such as cracks or fading, and address these issues promptly to prevent further damage.
If you live in a region with harsh winters, consider moving your globe to a protected area or indoors to avoid damage from freezing temperatures.
Troubleshooting Common Issues
Even with the best care, garden globes may encounter common issues such as cracks or fading. Here’s how to address these problems:
| Issue | Cause | Solution |
|---|---|---|
| Cracks | Temperature changes or impact | Use a suitable adhesive for minor cracks |
| Fading | Prolonged sun exposure | Apply a UV-resistant sealant or repaint |
Cracks can often be repaired with a strong adhesive designed for the globe’s material, preventing further damage. Fading, a common issue for garden globes exposed to direct sunlight, can be mitigated by applying a UV-resistant sealant or giving your globe a fresh coat of paint suited to outdoor conditions.
By following these installation and maintenance tips, you can enjoy the beauty and charm of your garden globe for many years, making it a cherished feature of your garden’s landscape.
Conclusion
In wrapping up, garden globes truly bring a unique blend of creativity and beauty to outdoor spaces. They’re more than just decorations; they’re expressions of personal style and a love for the garden.
The journey of making your own garden globe, from choosing designs to picking materials, is a path filled with opportunities for creativity. It’s a chance to put a piece of yourself into your garden, creating something that stands out and sparks joy.
We encourage you not to hold back. Dive into the vast pool of designs and materials available. Whether it’s glass, mosaic, metal, or even illuminated globes, each has its charm and way of making a garden special. Mixing and matching different elements can result in something truly unique and personal.
The satisfaction of completing a DIY garden globe project is immense. It’s not just about the final product, but also about the journey there—the learning, the challenges overcome, and the joy of seeing your vision come to life in your garden. Let your garden globe be a testament to your creativity and passion for enhancing your outdoor space.