How to Make a Slip Knot Crochet: A Step-by-Step Guide
Learning the slip knot is an essential skill for anyone starting their crochet journey. The slip knot is the foundation of every crochet project, as it creates the first loop on your crochet hook and secures the yarn in place. This technique is used in various patterns and stitches, making it a fundamental skill to…
Learning the slip knot is an essential skill for anyone starting their crochet journey. The slip knot is the foundation of every crochet project, as it creates the first loop on your crochet hook and secures the yarn in place.
This technique is used in various patterns and stitches, making it a fundamental skill to master.
In this guide, we will walk you through the process of creating a slip knot crochet step by step, so you can confidently begin your crochet projects.
Supplies Needed
Before you begin making a slip knot crochet, gather the following supplies:
- Yarn of choice: Choose a yarn that you feel comfortable working with, especially if you are a beginner. Medium-weight yarns like worsted or aran are often recommended for those new to crochet, as they are easier to handle.
- Crochet hook suitable for the yarn: The size of your crochet hook should correspond to the yarn weight you’re using. Check the yarn label for the recommended hook size, or consult a yarn-to-hook conversion chart if you’re unsure. Using the appropriate hook size will ensure your slip knot and subsequent stitches have the correct tension.
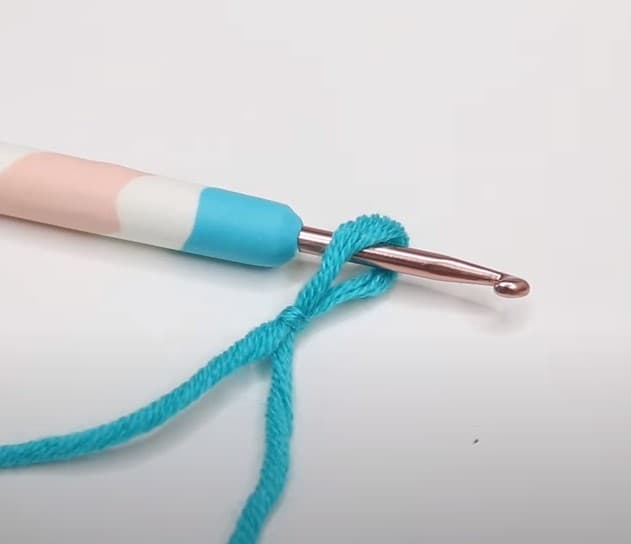
Step 1: Create a Loop with the Yarn
To begin making a slip knot crochet, you first need to create a loop with your yarn. Here’s how you can do it:
- Hold the yarn with both hands: With your left hand, hold the yarn tail (the end of the yarn) and with your right hand, hold the working yarn (the yarn connected to the ball or skein). Make sure to leave about 6-8 inches of yarn tail for ease of working.
- Form a loop using the yarn tail and working yarn: Lay the yarn tail over the working yarn, creating a small loop. Next, use your left hand to pinch the point where the yarn tail crosses the working yarn. This will hold the loop in place.
You should now have a basic loop formed with your yarn. This loop will be the starting point for creating your slip knot crochet.
Step 2: Insert the Crochet Hook
Once you have created a loop with the yarn, follow these steps to insert your crochet hook and create a new loop:


- Insert the crochet hook into the loop: Hold the crochet hook in your right hand and carefully insert it into the loop you formed with the yarn. Make sure the hook is facing upwards and the yarn tail is on the left side of the loop.
- Pull the working yarn through the loop to create a new loop on the hook: With the hook still inserted in the loop, use your right hand to grab the working yarn (the yarn connected to the ball or skein). Gently pull the working yarn through the loop, creating a new loop around the crochet hook.
Step 3: Tighten the Slip Knot
After creating a new loop on your crochet hook, it’s time to tighten the slip knot. Follow these instructions to secure the knot properly:
- Tighten the knot by pulling on the yarn tail: Hold the crochet hook in your right hand and use your left hand to gently pull on the yarn tail. As you pull, the loop around the crochet hook will begin to tighten, forming the slip knot.
- Tips for ensuring the knot is not too tight or too loose: It’s important to find the right balance when tightening your slip knot. If it’s too tight, it can be difficult to work with and may cause tension issues in your crochet project. If it’s too loose, the knot may come undone or result in uneven stitches. To achieve the perfect tension, make sure the slip knot can slide easily along the crochet hook but still holds its shape when not being pulled.
Step 4: Adjust the Size of the Loop
After tightening the slip knot, you may need to adjust the size of the loop on your crochet hook. Here’s how to do it:
- Instructions on adjusting the loop size on the crochet hook: Gently pull on the working yarn (the yarn connected to the ball or skein) with your right hand while holding the crochet hook in your left hand. As you pull, the loop around the crochet hook will become smaller or larger, depending on your preference.
- Importance of maintaining a comfortable size for the loop: The size of the loop on your crochet hook is crucial for maintaining consistent tension throughout your crochet project. A loop that is too tight may cause strain on your hands and result in uneven stitches. A loop that is too loose may lead to sloppy stitches or difficulty controlling the yarn. Aim for a loop size that allows your crochet hook to move smoothly through the loop without any resistance.
By adjusting the size of the loop, you’ll ensure a comfortable and efficient crocheting experience, setting the foundation for a successful project.
Troubleshooting Common Issues
As you learn to make slip knots in crochet, you may encounter some common issues. Here are a few problems and solutions to help you overcome these challenges:
Loose Slip Knots
Problem: Your slip knot is too loose and doesn’t hold its shape well, resulting in uneven stitches or difficulty controlling the yarn.
Solution: Gently pull on the yarn tail to tighten the slip knot. Make sure the knot can slide along the crochet hook while still maintaining its shape. If needed, adjust the size of the loop on your crochet hook by pulling on the working yarn until you achieve the desired tension.
Tight Slip Knots
Problem: Your slip knot is too tight, making it difficult to work with and potentially causing tension issues in your crochet project.
Solution: Loosen the slip knot by gently pulling on the working yarn while holding the crochet hook. Adjust the size of the loop on your crochet hook to ensure it moves smoothly through the loop without any resistance. Remember, a comfortable loop size is essential for maintaining consistent tension throughout your project.
Yarn Slipping Off the Hook
Problem: The yarn keeps slipping off the crochet hook while you’re trying to make a slip knot or during your crochet project.
Solution: Make sure you’re using the correct crochet hook size for your chosen yarn. Check the yarn label for the recommended hook size or consult a yarn-to-hook conversion chart if you’re unsure. Additionally, try adjusting your grip on the crochet hook and yarn to maintain better control. Practice forming the slip knot and maintaining tension on both the yarn tail and working yarn as you work through the steps.
Additional Tips for Perfecting the Slip Knot
To further improve your slip knot crochet skills, consider the following tips:
Practice Makes Perfect
As with any new skill, practice is essential to mastering the slip knot technique. Dedicate time to practice making slip knots with different yarns and crochet hooks until you feel comfortable and confident in your ability.
Experimenting with Different Yarns and Hooks
Working with various yarn types and hook sizes can help you better understand how they affect the slip knot and overall project tension. Try using different yarn weights and textures, as well as different crochet hook materials (such as aluminum, plastic, or bamboo) to see which combinations work best for you.
Watching Video Tutorials for Visual Learners
If you’re a visual learner, watching video tutorials can be extremely helpful in understanding the slip knot process. Search for slip knot crochet tutorials on platforms like YouTube, and try following along with the instructor to practice the steps in real-time. This hands-on approach can help reinforce the technique and make it easier to remember.
Conclusion
Mastering the slip knot is an essential skill for any crocheter, as it serves as the foundation for almost all crochet projects. A well-formed slip knot ensures consistent tension and provides a secure starting point for your work.
Remember to practice making slip knots with different yarns and crochet hooks, as this will help you become more confident in your abilities. Don’t forget to watch video tutorials if you’re a visual learner, as they can provide valuable guidance and reinforcement.


As you continue to practice and hone your slip knot skills, you’ll find that it becomes second nature, allowing you to effortlessly begin a wide range of crochet projects. So keep practicing, experimenting, and, most importantly, enjoying the creative process of crochet. Happy crocheting!
FAQs about “How to Make a Slip Knot Crochet”
What is a slip knot in crochet?
A slip knot is the starting point for most crochet projects, creating an adjustable loop around the crochet hook that serves as the foundation for your work. It’s important to perfect this skill, as it ensures consistent tension and a secure beginning for your crochet patterns.
How do I make a slip knot for crochet?
To make a slip knot, follow these steps:u003cbru003eCreate a loop with your yarn.u003cbru003eInsert the crochet hook into the loop.u003cbru003ePull the working yarn through the loop to create a new loop on the hook.u003cbru003eTighten the slip knot by pulling on the yarn tail.u003cbru003eAdjust the size of the loop on the crochet hook to a comfortable tension.
How tight should my slip knot be?
Your slip knot should be tight enough to hold its shape without sliding off the crochet hook but loose enough to allow the hook to move smoothly through the loop without resistance. Finding the right balance is crucial for maintaining consistent tension throughout your crochet project.
Can I use any type of yarn or crochet hook for making a slip knot?
While you can practice making slip knots with various yarns and crochet hooks, it’s essential to use the appropriate hook size and yarn weight for your specific project. Check the yarn label for the recommended hook size or consult a yarn-to-hook conversion chart if you’re unsure.
I’m having trouble making a slip knot. What can I do?
If you’re struggling with the slip knot technique, consider watching video tutorials for visual guidance, practicing with different yarns and hooks, and troubleshooting common issues such as loose or tight slip knots and yarn slipping off the hook. With practice and patience, you’ll improve your skills and master the art of creating slip knots in no time.